Like all the cars I obtain, I don’t mess around, so today I tore into the brakes to replace the leaky cylinders.
What we had was a braking system that had no pedal feel, and wouldn’t actually stop the car unless you pump the pedal, and then it would brake hard on one front wheel and pull to the right. This was after many attempts to bleed the system.
Yesterday I took the drums off (it has 4 wheel drums, woo technology) and inspected the shoes and cylinders. The front left was showing clear signs of a serious fluid leak, with everything wet, and the shoes had soaked up fluid and were badly contaminated. All the others at the time appeared to be dry.


This morning I shot to Repco and picked up a pair of left hand cylinders. Unfortunately they had no stock of the shoes, but BNT in Lower Hutt did, so I drove in and grabbed a set of them.

To start, I clamped off the brake hose, so I didn’t end up draining the system completely

And then removing the shoes was as simple as just lifting the top shoe off the cylinders on each end, doing the same to the lower shoe, unhooking the springs (whilst taking care to note how they are attached), and then removing the lot.


The shoes were well stuffed and had transferred material to the drum


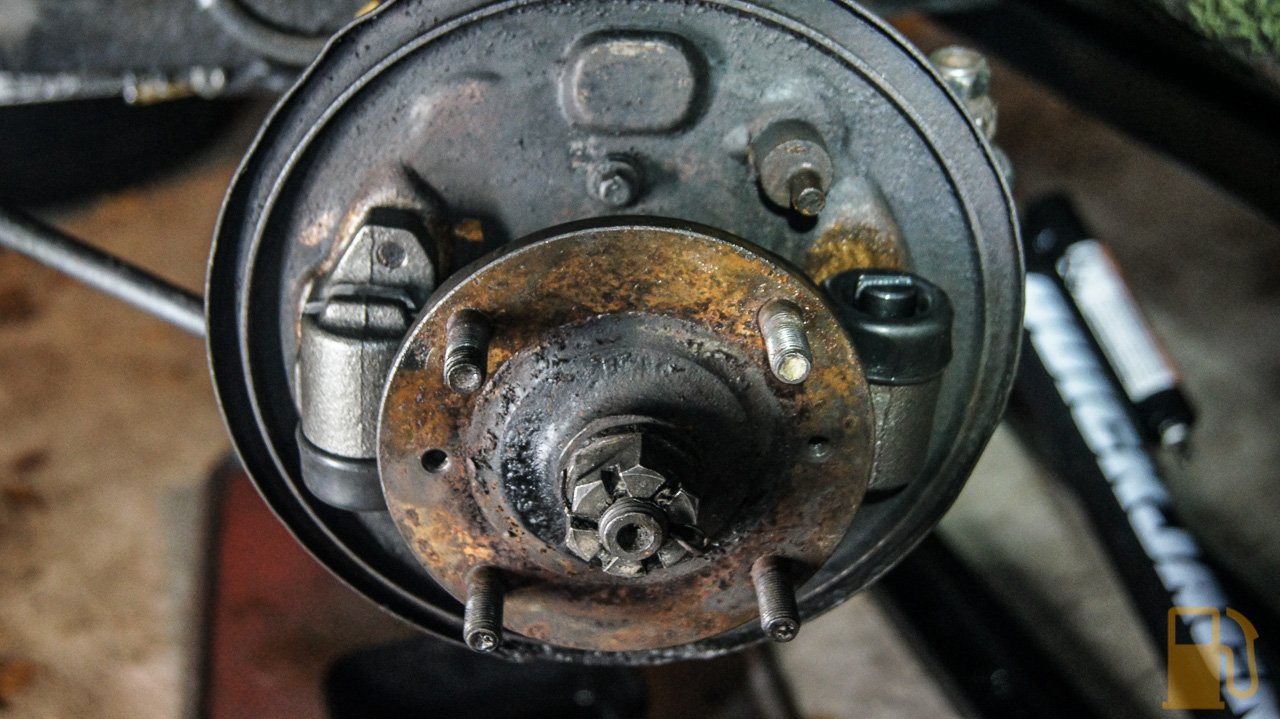
Just a quick side note whilst we have it apart, this is how the adjusters work for the front. There are two squares on the rear of the drum backing plate which are the adjusters. They requires a 5/16″ open spanner to turn.
This is what the adjusters look like on the inside of the drum with the shoes removed. The red arrow is the top shoe adjuster, and the green arrow is pointing to about where the lower adjuster is, behind the flange.

You can see the adjuster is an offset pin that rotates, pushing the shoes closer to the drum. If we start with the adjuster wound right back, it doesn’t touch the shoe at all

And if you put a spanner on it, and rotate the direction of the tire (anti clockwise in this instance) it will contact the shoe and push it out towards the drum. The lower adjuster works in exactly the same way.

So, with that little interlude, lets continue. Heres the split CV boot (replacement ordered)

And then I removed the wheel cylinders. First you remove the bridging pipe from the back, that links the two cylinders. Then remove the bleed valve from the rear cylinder. Next crack off the main brake hose nut, but do not try to undo it completely as the hose cannot spin.
Before you can remove that hose you need to remove the two bolts in the rear of the cylinder and pull the cylinder forward with the hose. Since the hose was cracked off, you should be able to spin the cylinder off the hose and then remove it.

Heres the two old cylinders and link pipe

It was pretty grotty in there

I hosed it down with brake cleaner, and scrubbed it. I wire brushed where the cylinders sit, and put a thin coat of copper grease on the backing plate so the cylinders don’t rust to the backing plate like the old ones did


On went the new cylinders


Now, before moving further, change of gloves was needed so as not to contaminate the new shoes

Refitting the new shoes was the reverse of removal. Gently place the shoes into place, hook the springs on, and pull the shoes onto the cylinders. Done

Back on went the drum (after a thorough cleaning, and removal of all the stuck material), and then I adjusted the shoes. Back the adjusters off so the drum spins freely. Doing one adjuster at a time, slowly turn the adjuster until the drum stops spinning freely. When you hit this point, slowly back the adjuster off until the drum just spins freely. Then move onto the other adjuster.

I hadn’t touched the front adjusters since I got the car, but they were way out of adjustment. No wonder the pedal feel was bad.
Moving onto the other side, since shoes come as a pair I was going to replace the other side too. I pulled the drum off, and damn….

I’m sure this wasn’t leaking when I checked yesterday, but it’s bucketing out now. The rubber boot is full of fluid. Oh well, guess I need the RH cylinders too.
By this time it was too late, the shop was closed, so I’ll have to get the cylinders tomorrow. In the mean time I whipped off the shoes. They have no signs of liquid contact, so I’ll save them as spares.

Since I couldn’t do any more work on the brakes today, I moved onto checking some wiring. I had a lot of things that didn’t work, and I was sure most of them were linked. I picked up a cheap test light when I was out, and went onto probing the fuse block.
I had continuity across all fuses except one. I triple checked, and nothing. I wiggled the connectors and removed and reseated the fuse, and bam, the test light lit up. I had power.

So now I have working wipers (they’re so small and cute, but also more powerful than the SD1 wipers; go figure), a brake switch thing that lights up

A demister switch that lights up when held (the switch doesn’t latch properly, will have to disassemble and inspect)

Dash cluster lights, and the blower fan works now. Yay!
I still don’t have indicators or hazards though. I can’t test the brake lights due to having the brakes apart too.
I tracked down the flasher relay, and it didn’t look good.

BADLY corroded terminals on both the relay, and the holder

I tried cleaning up the terminals, but still couldn’t get it to work. Will need to remove the holder and maybe replace the terminals. Also need to track down another flasher relay.
I also found this random relay floating around above the wiper motor. Has two wires going to it, doesn’t look standard, and two more wires terminated near it. Will have a look in the wiring diagram and see what it is. Maybe hazard relay?


I also need to find where the speedo cable connects to on the gearbox. I had a good look around but haven’t spotted it yet.
I’m hopeful that if I can sort all these issues, I might be able to take it for its registration check in the next couple of weeks.