If the transmission in your Toybaru Twin has ever been out of the car, there is a chance the reverse lockout plate on the shifter is no longer correctly adjusted and maybe impacting shifting.
In my case I knew the previous owner had the transmission out for some work, and knowing it was quite hard to shift 1st and 2nd gears, I suspected my reverse lockout plate wasn’t correctly adjusted.
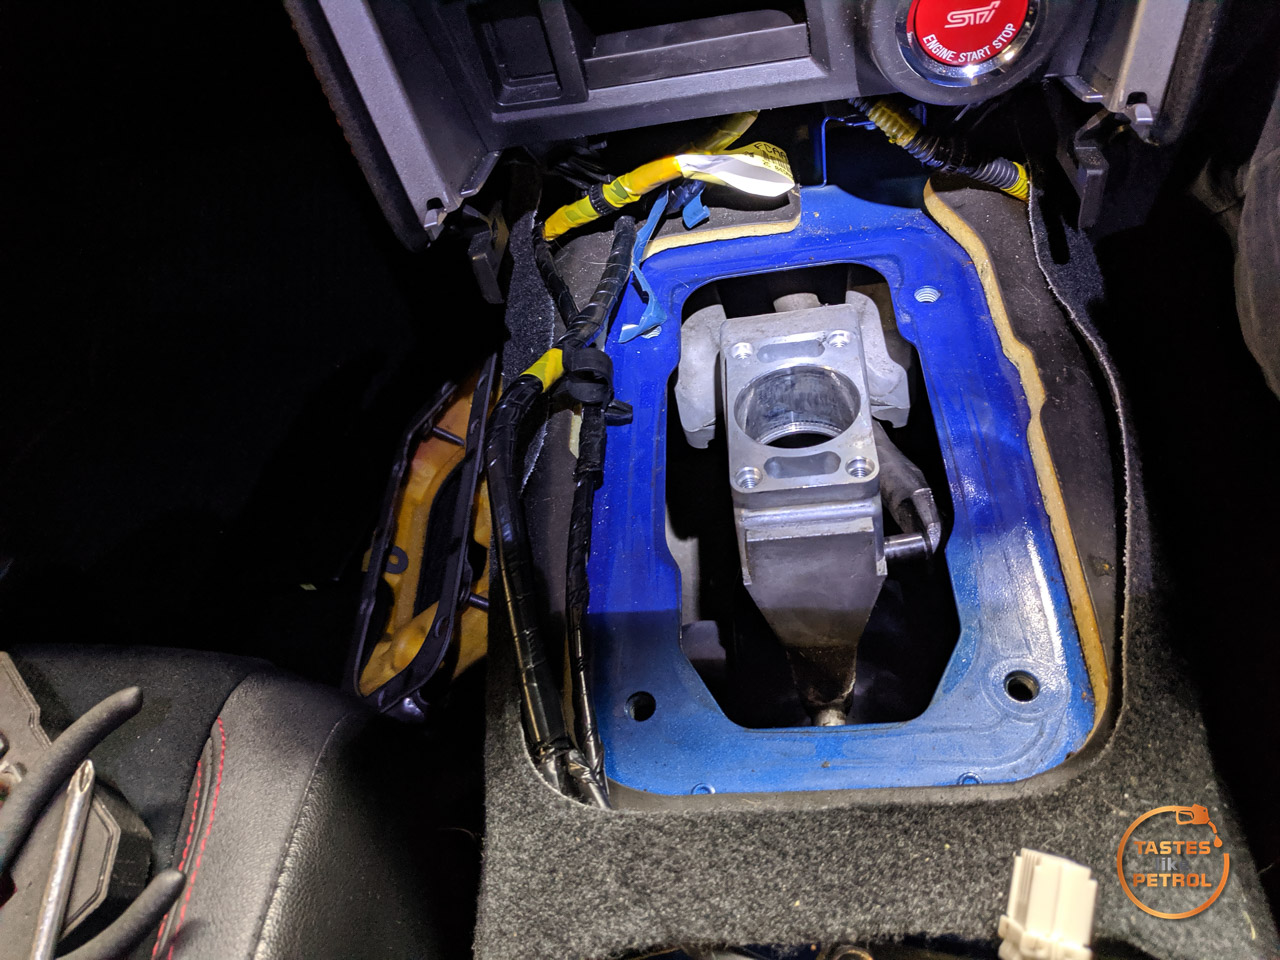
This is a reasonably easy task to do, albeit with the complication of having to remove the center console to access the shifter assembly.
To start with I removed the shifter surround by gently reaching down into the shift boot, grabbing the inside of the plastic surround and pulling upwards on the front of it. The back slots in with a tab, so you need to start with the front.
Once it lifts up, unplug the connector for the traction buttons, remove the shift knob, and the whole surround comes off.

Next the little pocket in front of the shifter, with the start button, needs to be removed (or at least free’d and moved to the side). The manual says to just grab it from inside the pocket around the start button and pull, but I couldn’t get that to work, so I removed the little side trim below the knee pad on the side (pulls free) and using a screwdriver gently pressed it against the back of the pocket and pushed towards the rear of the car until it popped.

Both methods are offical ways to do it, according to the service manual

This is a good time to unclip the handbrake boot by pulling it upwards and then sliding it off the handle.
There are six screws holding the center console in, two under the pocket I just removed at the front, two behind the shifter and the final two are under the rubber mat in the “cupholder” storage tray area.
With the screws removed, the console can be lifted, plugs disconnected (don’t forget the one for the power socket) and the console removed. I slid it back into the back seat for enough room.

Now its time to work on the shifter. Remove the big foam insulator on top, this has two white plastic screws on studs that need to be unscrewed

and then remove the four bolts holding the metal boot retaining plate down. This will free the rubber boot and let you acess the reverse lockout plate

I found mine was out of adjustment and too tight to the lever when in the 1st and 2nd positions. When going from 3rd to 2nd for instance, you had to push the shifter against the lockout plate, which made it harder to shift into gear and felt pretty yuck.
The spec is a 1mm gap, when the shifter is in 2nd gear, and lightly held to the left (since my shifter has a little play in gear).

I loosened off the four bolts securing the plate, just enough that the plate could be tapped into place but had enough resistance it didn’t move freely and then slipped 1mm of feeler gauges in the gap, making sure the blades were parallel with the face of the shift lever “detent” (as the vertical stopper is actually curved)

I then nipped up the bolts and checked the shift action. Mine was better, but if you find the gap too big, the manual says you can reduce the shim size by 0.2mm and try again until it’s right. Also check it still blocks reverse unless the collar is lifted, and that you can actually get into reverse too.

I used some lithium grease on the two faces and then reassembled everything.
I’ll tell you what, other than the Motul fluid in the transmission, this was one of the biggest improvements to shifting I have made. I didn’t think it would do much, but it’s significantly easier to shift into 1st and 2nd gears, and by some placebo, the rest of the gears feel smoother too.
From factory this should, in theory, be correctly adjusted already, but obviously whoever reinstalled the transmission in my car just kinda set it by eye.
Whilst my overalls were still clean I had a couple of other things to do in the interior.
I have no idea what was going on, but the gauge cluster lens was junk. I’m not sure if someone had tried to clean it with something it didn’t like, or if they had a sticker or something dumb on it at one point, but this is what I started with

I polished it with PlastX and it got slightly better, but it was still hazy, particularly around the tacho

It seemed the only way to actually cure it was to replace the lens completely. I did this on the Alto, and it was well worth the $30 or so from Japan.
So I ordered a new lens from a GT86 (since the BRZ one appeared to be NLA) and set to work replacing it.
The radio surround has to be removed, which just pulls off, and then the top visor needs to be removed. This is held with a single screw in front of the cluster, facing upwards, and then with a bunch of clips which require you to pull it up and toward you to remove.

The cluster surround then pulls forward. This is attached to the column shroud, so I opted to just pull it forward instead of removing it. This left me with full access to the cluster lens.
You don’t need to remove the cluster. I just used a small flat blade to pop the clips around the perimeter of the cluster to remove the lens

I took a lot of care not to touch anything inside the cluster, or to touch anything but the edges of the lens just so I didn’t have rogue fingerprints everywhere.
After reassembling, the results were dramatic

Its crystal clear now. I think for the money, its one of the easiest ways to uplift the interior of an older car. You spend so much time looking through this lens, it might as well be spotless and not scratched or marked.
Finally, the cabin filter was replaced. Fairly easy, just open the glove box and squeeze the sides in so the stoppers on each side pop out and let it drop down further

The filter is behind the white cover. Gently press in the clips on each side and remove it


Take note of the orientation and remove the filter. Mine was full of junk. Likely not changed since before it left Japan

And slip the replacement filter in, oriented correctly (UP is up)

Reinstall the cover, hook the glove box back in and job done. Enjoy the nice clean air coming through the vents.
Parts Used
Toyota SU00302619 – Cluster Lens
Roadpartner 1PS961J6X – Cabin Filter
Please note these parts are specific to my car and may vary. Please check before ordering.