
It’s never a dull day in the garage when you own a Rover.
Having shown off Tess at the show the other day, it was time to start digging further into some of the issues she has. I couldn’t risk doing this work before the show, in case it was delayed and didn’t make it there. That was a good choice it seems…
So what was the plan? Well, the obvious first step was to replace the springs and shocks with new shocks and standard Vitesse height springs. I purchased these on sale with the steering rack, because I knew the current setup was bad. The front shocks could be compressed by hand on the car, and the front was just too low to be practical. The rear also bottomed out badly over bumps, to the point it would pop the passengers glove box open on hard bumps. It wasn’t pleasant.
The other job I wanted to do whilst there, was to bleed the brakes. They haven’t been touched in at least 4 years, since the car was sitting, but who knows how long before that too. The pedal was spongy, but the brakes did all work, just not as good as they should (and not as good as Effie).
A surprise job was thrown at me the other day too; I needed to do the transmission fluid. I knew the gearbox wasn’t happy because it whines and rattles, but changes smoothly and otherwise drives well. The other day I picked the wife up from the train station, and proceeded to do a 0-100kph full throttle pull on the motorway. Shit it sounded amazing, but after that I had some reservations about the gearbox and decided to park her up until I could get her in the air.
I noticed after that run the gearbox developed a clunk coming off throttle, and was making a different whine. It wasn’t happy. I needed to have a look.
So today I decided it was as good time as any to get Tess in the air and start spinning some spanners. I got her up on all four stands, and made a hovercar. Being the first time I have had all four wheels off the ground in one go (except for the WOF), I had a good look around and got some photos.
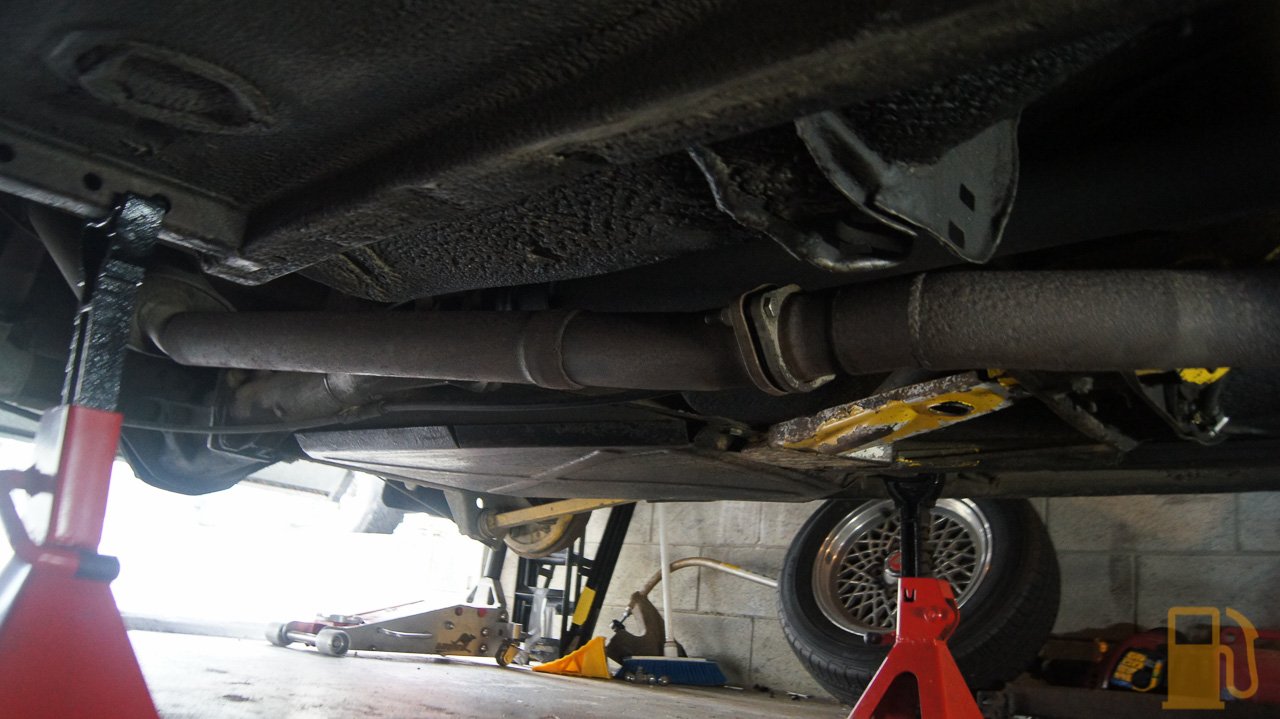
These are the lovely box section rear trailing arms. No, I don’t know why they chose these over the readily available standard ones.

And the massive exhaust. Its well built and looks good. I’m pleased to see standard two bolt flanges all through it, instead of the stupid flanges the Rover uses standard (three bolt, sliding flanges with olives).

And the target for today’s suspension, the front struts

Before that though, I wanted to tackle the gearbox. I needed to drain the oil and see what the state of that was.
On the SD1 LT77 gearbox, the drain plug is on the drivers/RH side in the iron mid case, and the fill plug on the passengers/LH side, in the alloy rear housing.
This is the drain plug. On the D suffix box it’s a 32mm hex

and the fill plug (with a socket on it). This is 15/16″

As it turns out, the gearbox in my Vitesse is a suffix C box and not the D suffix it should be. So many things have been changed on this car, it’s no real surprise. The suffix C box uses 15/16″ for both drain and fill plugs, but they are in the same location as above.
I cracked and removed the fill plug first (as is good practice, just in case it’s seized in, and you drain the oil without a way to get it back in) and then removed the drain plug. To my surprise, only a tiny trickle of oil came out. Nuts. That might have something to do with the angry gearbox. This is all that came out (ignore the coolant, that stuff is everywhere in my garage). Probably 50ml or so, not the 1.9L it should have.

Bloody amazing the gearbox worked half as well as it did considering!
The drain plug has a magnet on it, to catch metal shavings that occur in normal use. Amazingly, this magnet did have some shavings on it, but nothing too unusual for an old gearbox. No chunks.

I gave Sonic the Metallic Headgehog a haircut


And then it was time to get radical (dude). The SD1 whisperer, Ramon Alban, wrote up many years ago about how he flushed and cleaned his gearbox out, and swears by it. Others on forums have also done it with good results. I figured, since my box was already in a bad way, it can’t hurt. The flush calls for a 2:1 ratio of white spirit and ATF. Fill the box with that, run it through the gears with the engine running and then let it idle for 10 minutes with no load. This ensures that the oil pump in the gearbox circulates the mixture everywhere, and that it gets into all the gears and syncros.
I grabbed two bottles of white spirit from Supercheap, and just used some leftover ATF I have from doing auto services.

These by the way, are one of the best tools you can buy. It’s a hand pump bottle, with a hose and curved steel pipe on the end. The pipe hooks into the filler hole, and you can pump up to the trans from the ground. Its easy, clean and no fuss.

So in that mixture went, and as per the instructions I ran the car through the gears. The box was a little quieter, but that was probably just because it now had some oil actually in it…
This is what came out. It went in pink as per the photo above….


The magnet also found some more shavings

Still no chunks though, so we are kinda winning. I filled another couple of pump bottles of fluid and pumped them into the gearbox, and did it again, this time leaving it to idle for longer. This time the fluid came out much more pink.


This time the gearbox was much quieter in operation, so maybe it is helping. We will see. I have a special mixture of oil to go in, but first I need to grab some new fibre washers for the plugs. More on that next time.
Anyway, onto the shocks. Unlike the Mini, the front struts on the Rover also incorporate the hub and stub axle, so you have to remove it all in one go. This makes it heavy, and awkward to work with. Another issue I soon encountered, was that my bloody swaybar is kinda rust-welded into the lower arm and I cant remove it without cutting it off. Lame. Glad it has urethane bushes I guess.
To make life easier, I unbolted the front calipers from the hub and hung them up. Well, one of them anyway…


The passenger’s side didn’t go so smoothly, and the bastard thing broke the copper hard-line that goes into the caliper. I didn’t even apply much pressure to it, so obviously it was weak. It turns out that the pipe was rusted into the nut, so that didn’t help.


Question. How do you stop a broken brake pipe from draining the master cylinder reservoir (when you have braided lines and can’t clamp them off)? With a rubber glove of course.

Stretch it over the opening of the res, and zip tie it in place. This creates a seal in the system, so the fluid can’t just freely drain out. As you can see above, it pulls a fair bit of vacuum, so to be safe I also used a silicone cap to plug the pipe in the meantime. Better safe than to drain the whole system onto my garage floor overnight and then have to refill an empty system.
So that sucked, and now I have to go get a new pipe made up. The one plus to this is that since one caliper is off, i’m going to look into repainting both as they are looking pretty haggard. Many layers of flaking paint.


Moving on, back to the struts. I unbolted the swaybar from the crossmember, so that it could hang down (since I couldn’t remove it from the arms), and one of the lower arms had to be removed (or the swaybar still fought me). With all that sorted, out came the struts.


On went my sweet spring compressors

and off came the strut top

The boot on the RH side is mint, but the LH is torn and will need replacing. The same can’t be said about the front bump stops. Years of being smashed by lowered suspension had turned them into chunks floating around in the boot

You can also see a lot of oil floating around in the above photo. This is from the shock, as it had been leaking badly but was contained within the boot, effectively hiding the failure. The shock on this side was so bad that as soon as the strut top was off, the shock collapsed down by itself. You can pull it up by hand, but it pulls itself down again. Well buggered.
The next fun was to remove that massive nut on top of the strut leg, so I could remove the insert. I didn’t have any spanners big enough, so what do I do? Improvise. Out came the chain oil filter wrench and a breaker bar.

Other than the strut flopping around, this made short work of it, without even damaging the nut. I could reuse it if the new shocks didn’t already come with new nuts.

Off came the nut, to reveal the shock insert.

I saw in the receipts the front shocks had been replaced years ago, but wasnt sure what was actually in here. The shock should just pull straight out; and this is what I have. Monroe Gas-Matic.

This is the difference between the old and new shock

and the old left and right shocks (left on top)

Old spring vs new spring. You can see the new spring is a fair bit longer and slightly thicker coils.

I added a squirt of hydraulic jack oil into the strut leg (adding this is neither here nor there; some say its to help transfer heat from the shock to the strut leg. It’s easy to do, so I did it), and slipped the new shock into the leg. A couple of dabs of copper grease, and on went the new nut. This was tightened by hand as much as possible, and then cranked up tight with the chain wrench. Its well nifty that thing.


Anyway, that’s where we sit today. I can’t reassemble the front struts without new bump stops, so i’ll need to express freight some from Rimmers, and I need a new brake line made (but first I need to undo the old one from the braided flex line, which is proving to be very hard to do). Tomorrow I will swap the rear shocks and springs, and hope that goes well and that I don’t need parts for that too (and if I do, I’ll add that to the order). Thankfully the new shocks have new bushes for that.
To be continued.