Of course, nothing is ever simple. Try and sell a car, get messed around a bit, try and take it for a WOF to make it easier to sell, and oh hey, it failed. Thankfully nothing too major, just a couple of flogged arms.
With over a month still left on the WOF, I thought I would try and renew it anyway and see if it would help me get a sale. I’ve had a couple of people ask for an AA check, and TBH I don’t put much faith into those checks, and it a big hassle for me to make the car available for it to be checked (since they won’t do it on the roadside, where the car lives). I’m hoping a new WOF is enough to make people trust its a good car and not a junky jalopy.
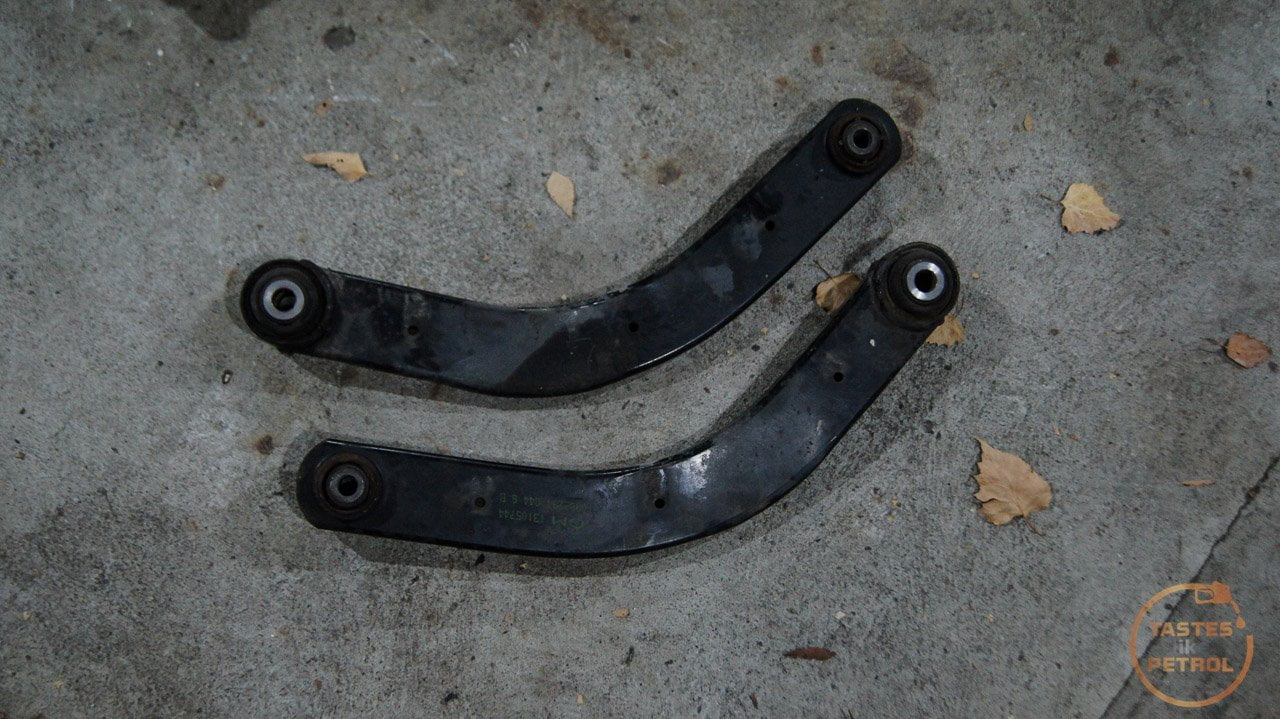
Typically, the car failed the WOF inspection. It turns out the annoying clunking I could hear over bumps was actually something, and not just something I should’ve been ignoring. The rear upper “banana” arms had failed and had excessive play in their ball joints.
My awesome WOF guy took the time to show me what the issue was, and sure enough, if you unloaded the arms by lowering the car partly onto its wheels (not fully on its weight, and not hanging from a hoist as this loads the joints up and makes them unable to be tested), if you rock the top of the tyre back and forth not only could you see the movement in the joints, you could see and feel the top of the wheel physically move back and forth.
I guess its no surprise that I have been chasing an alignment issue with the car since I got it, and had been told the camber adjuster on one side was at its limit but the alignment was still out. The movement in the top of the wheel is the camber dynamically moving. There was also a solid clunk from the back end going over bumps, which I kinda just put down to top-notch GM build quality.
Anyway, I tracked a pair of pattern parts down from the local Autolign store and had them in my hands the next day. You can also get the genuine part from any local Holden dealer as its a common Vectra part, but it does cost significantly more for genuine.
Looking at the parts on the car it appears they might be the original arms. They have the original (not updated) GM part numbers on them

The rest of the car was looking great underneath. Dirty, but dry. Mmm polybushes.


Mmm Bilsteins


Having some time to spare this weekend I got stuck into replacing the arms. The sooner I replace them, the sooner I can renew the WOF and hopefully sell the car. I can’t sell it in good faith unless it’s fixed.
Whilst my Wife had the Honda out, I took over that side of the garage. Up went the Saab on the Quickjacks (with a sneaky TVR in reflection).

Off came the rear wheels

And I could see what I was dealing with. This is the inner bolt of the arm here (finger for scale pointing). Its a prick.


The outer bolt is just on the top of the hub. Nice and easy to access.
Now, in terms of tools, for the outer bolt you need an E20 E-Torx socket and a 21mm spanner. The inner bolt is smaller, so uses an E18 E-Torx socket, and an 18mm spanner. The inner bolt is horrible to access, and the RH side one is worse due to limited space.
I found if I slipped the spanner onto the nut and left it there it would hold the nut in place, but I didn’t need to try and loosen that off. The majority of the work was on loosening the E-Torx side, as that was the only side that has access with a ratchet (the other side has no access, a spanner is the only thing that fits but there isn’t enough space to actually turn it, as the bolt is bloody tight).
I used a flexible head ratchet, a 3/8-1/2″ adaptor, and a short wobbly extension. The ratchet just fit between the subframe and exhaust. I had to extend the ratchet with a pipe to get enough leverage to crack the bolt.


Once cracked, unclip all the clips holding the wiring to the arm and tuck it off to the side

And then crack the big bolt on the other end. Remove the big bolt, and wiggle the arm to remove the inboard bolt (jacking the arm up and down can help to unload the bearings and make it easier to remove the bolts). Unclip the handbrake cable from the arm, towards the front of the car. You don’t need to disconnect it from the caliper, unclipping it from the arm gives enough play to work with.

Outboard fixing with bolt removed. Hand brake cable runs over the arm.

Now with some wiggling and jiggling the arm should pull free of the car.
I shouldn’t be able to deflect the bearing with just my thumb, at all, let alone to its limits. You can also feel a click when you move the bearing in the joint

In contrast, the new bearings are stiff and tight, only being able to be moved using leverage like a long screwdriver.
Removing the LH side arm is the same deal, except you can get a little more leverage with the ratchet by using a longer extension and passing it through the gap above the exhaust. Using a wobbly extension is a must though (in fact the whole job would be impossible without wobbly extensions).


Fitting the new arms is basically the reverse. Start by placing the new arm into the subframe and under the handbrake cable at the hub. Using lots of wiggling and jiggling slip the inboard bolt through. I found slipping a screwdriver through helped to line up the bearing.
The outboard bolt is a bit trickier. You will need to jack the arm up and down in order to line the arm up and get the bolt through. Once both bolts are through and the nuts are on, all that’s left to do is tighten them and refit the wire clips.
To tighten the bolts up you must raise the arm to about ride height first. The inboard bolt should be torqued to 75NM+90 degrees, but I’m dammed if I could get a torque wrench in there, so just tightened it up to F’N tight. The outboard bolt is 125NM+135 degrees.
Now pop the wheels backs on, lower the car down and torque the wheels up to 110NM and that’s the job done.
A test drive showed some very interesting results. First, the annoying knock is completely gone. The car is completely silent over bumps now. Quieter than expected.
Secondly, the road manners are much better. The tramlining, wandering and vague feeling is gone. The car feels a lot more solid, especially on the open road where it was always a bit floaty. Some of the harshness over bumps is gone too.
Good result I say. I’ll be getting the WOF rechecked this week and then we should be good to go.