Things went from bad to worse, but what else did I expect?
With the gearbox in bits and the diff clearly given up on life, I wasn’t in the best mood, but I needed to dig further and see what other damage had been done.
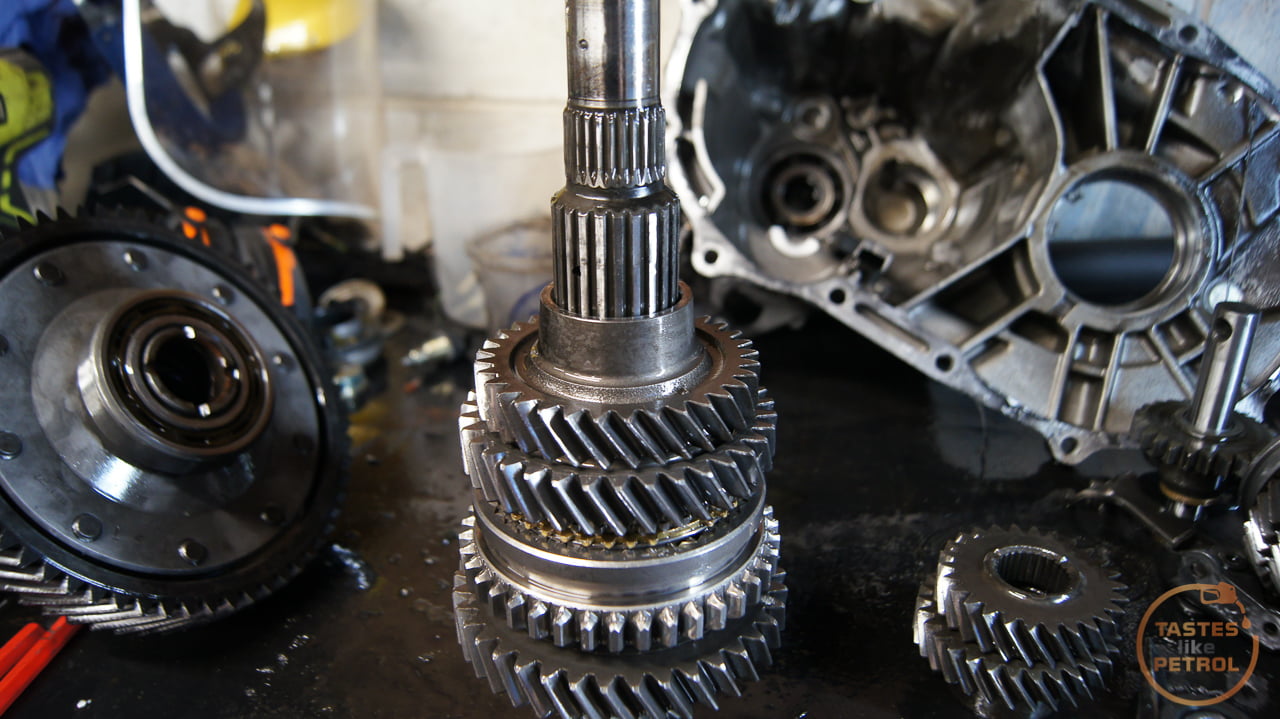
The first step was to carefully strip the gear clusters down and check what the shafts and needle bearings were like.
The input shaft got inspected first as there is nothing holding the gears on, so it’s very easy to strip it.

I slid the 5th gear synchro hub off and the gear just slips off the needle bearing

The bearing spun freely but felt a bit rough

This might explain why. Deep grooves in the sleeve where the bearing runs

The sleeve slides completely out and has another bearing on the other side. You can see how the sleeve should look; smooth and slick

That was the worst of the damage on that shaft. Everything is covered in grey sludge, so will need a clean, but all the gears and synchros are in good shape and operate how they should.
The main shaft on the other hand wasn’t so good. This has a big left-hand threaded nut holding it all together. I whacked the shaft into the vice and used the impact gun to spin the nut off.

Those two bearings at the top had eaten metal and weren’t spinning smoothly.
With the bearings removed, using large flat blade screwdrivers, the gears just slip off the shaft.


The last gear on the shaft. Everything is once again covered in grey sludge, and the oil passage in the shaft has fine metal filings in it.

Sadly I found more damage to the pinion gear on the main shaft, so that is now scrap. I carefully reassembled the shafts to keep them together and in the order they should be.
Next was to strip the casings. This meant removing the magnet, bearings, oil guides and selector.
The magnet was just absolutely covered in metal, and there were chunks hidden in various places in the housings. Lots of little crevices at the bottom of the box where the metal had settled and got stuck.


The input shaft bearing in the back of the casing basically fell out (as it should, these sometimes come out with the shaft).

There are a couple of shims and a spring washer behind this bearing. Removing them and the oil guide revealed more hidden metal

To get the two bearings out of the bellhousing side of the housing, it is common to use boiling water to expand the housing. I boiled the jug, and the moment it stopped boiling poured it into the casing on the opposite side to the bearings.

Both just dropped out within seconds.
Which revealed more metal. Quite a bit behind one of the bearings.


Next, the selector shaft was removed. This is held in with two bolts. One bolt holds the selector fork on the end in place

And the other is for the detents on the shaft. This one has a spring and ball bearing under it. I used a small magnet to retrieve the ball bearing.


The shaft can be withdrawn then

The oil seal can be removed now too. I used a flat blade behind the lip to lever it out.

The casings then got a really good clean with degreaser and brake clean, and finally a quick touch up with a soda blaster. They came up ok at best; I think they need a proper sand or vapour blast, but I don’t have the time or money for that. Plus, it’s just a gearbox that is going to get covered in oil again soon.
That night I made a list and ordered a bunch of parts. Various bearings I didn’t order initially (such as all the needle bearings), a couple of spare seals, the Quaife ATB diff, and a couple of awesome people on the Rover Coupe facebook page sorted me out with a replacement main shaft, bearing sleeve and RH Inner CV joint.
In the meantime, whilst waiting for those parts to arrive I removed the clutch and flywheel

Well, I tried to, anyway. Turns out the clutch had been replaced somewhat recently, and the pressure plate bolts had been reused… and torqued to round. Five of the six came out without too much trouble, but one would not budge.

I tried everything I had. Bolt extractors, vice grips, a smaller socket, an impact driver, punches, chisels and finally an easy-out. When the easy-out snapped in the bolt… I reached for the grinder. The bolt spun out once most of the head was cut off.

This revealed that the clutch wasn’t looking too hot anyway. The pressure plate is covered in heat marks, and the inner area of the clutch material on the flywheel side looked chewed up.


And a similar story on the flywheel too. Lots of heat marks and felt uneven to the touch

The numbers on the clutch indicate that it’s an OEM replacement. I suspect that the flywheel wasn’t machined last time the clutch was replaced, and then it suffered lots of abuse. Heck, it could’ve been a second-hand clutch. I don’t know.
I had the flywheel machined by a local specialist. Looks much better now.

With the flywheel off you can see how much oil has been leaking down the side of the engine. It’s all coming from up top (mostly valve cover gaskets). The rear main seal was dry, so although I had a replacement I chose not to replace it this time (as it requires draining the sump and lowering it enough to remove the seal).

I gave that backplate a quick clean

And as per the manual, cut a slot in an old flywheel bolt to clean out the threads in the end of the crank

It worked quite well, pulling out the gunk from the threads. The manual explicitly states not to use a tap to do this job.

New bolts with pre-applied thread locker

The flywheel was lifted into place and the bolts fitted. These were torqued whilst using my longest prybar to lock the flywheel against a bolt

All torqued to spec, and paint marked

Note there is no spigot bearing in the end of the crank. Apparently this is due to the PG1 transmission having such a short input shaft it doesn’t need one.
Next was the clutch. I went with a slightly uprated clutch from a diesel version of this engine. It’s the same fitment but has a higher clamping pressure, Kinda OEM+.

Awesome clutch alignment tool that came with Tess and has now been used on two of my cars. New clutch cover bolts fitted too.

All torqued and ready to go

And that was as far as I could take that part of the job until parts arrived.
There was one last thing I wanted to do, “while I’m here”. The coolant pipes.
I had purchased a pair of snazzy stainless pipes from the UK when they popped up on Facebook, and since my lower pipe was very crusty, I set about replacing it.
Draining the coolant was a lot easier without the front cross-member in place

The top hose comes out as I have a replacement for this too. A NOS hose I sourced from Japan of all places. Complete with (currently missing) thermostat.

With a bit of wrestling, the bottom pipe and all hoses attached to it came out

The old pipe against the new stainless replacement. I have a replacement for the hose still on the pipe, which is just as well, as it was stuck on there.

The small turbo drain elbow and lower waterpump hoses will be replaced too. The elbow is easy as that’s just a 90 degree 15mm hose but I’m having to source the lower waterpump hose from Greece.
Another hose I have a replacement for is this one for the mid pipe for the heater. Some bastard didn’t think of the next person working on the car when they refitted this, as the hose clamp was facing the wrong direction and blocked by the alternator.


Thankfully I could just slip a 1/4″ ratcheting spanner in there and loosen it enough to turn it to a place I could reach.
Speaking of the mid heater pipe, it’s the one pipe I didn’t have a stainless replacement for as it wasn’t available. I decided since it was also looking crusty that I would remove it and give it a spruce up.

As it turns out, this is the one I really needed a replacement for. All the ends where the hoses connect are badly corroded and holed, whilst half way down the pipe a previous owner has sealed a hole in the pipe with some sealant. Yay. I’m currently scrambling for options on this one as new pipes are NLA, and all the reproduction stainless pipes are currently sold out too.
So I’m at a dead halt on a few things there. I need a solution for that pipe, and I have a hose still in transit. The gearbox needs a bunch of parts, but since starting this post they have arrived now, so I can start reassembly of the gearbox.
The Quaife ATB is so pretty. Damn it’s heavy though!

More soon.
Try a pipe fitting company who specialise in food and beverage, they can usually make stainless pipework, especially if you have the old one as a pattern.
Cheers. I’m working through some options now, hopefully have something sorted in the new year.