With the Tomcat finally on the ground again I could get around to doing some smaller jobs that I didn’t have space to do before.
The first was to replace the door switch on the RH side, again. I replaced both door switches when I first got the car as both had broken and the interior light didn’t work.
Unfortunately the same night the gearbox gave up, I opened the door and a piece of plastic fell on the ground and the switch was missing its lever again. Nuts.

Thankfully Pick a Part still had a Rover 45 in the yard, so I grabbed a couple of original Rover door switches from that, but whilst I was there I had a look at a Honda Concero (the platform brother of the Rover 200) they had and noticed it had a different style of door switch, in the same location and a similar design.
The Rover ones look like this; All plastic design. Broken on the right.

The Honda one has a metal base with a slightly different plastic lever that has a more gentle radius on the 90 degree bend the Rover one usually breaks at.

The underside is more or less the same, and its retained in the same manner

It was easy to fit, slots right into place.

And the interior light works a treat

The best thing is that the Honda switches are also used on the 1st gen RD series CRV, which are a dime a dozen at wrecking yards (Pick a Part currently has 9 on the yard), unlike Rovers (zero on the yard).
The next small but satisfying fix was to replace the brake light switch. I looked into an issue with the brake lights back when I first got the car, and I tried to adjust the switch, which did work for a bit, but was really touchy and often left the lights stuck on.
I picked up a generic Tridon switch, TBS041, which was listed for a Honda Civic, which has the same thread, plug and design.
The switch is tucked up under the dash, in an almost inaccessible spot above the pedals. I removed the panel under the dash, which gave me a little more room to work with but still meant contorting myself into the footwell. It lives here, screwed into a bracket above the brake pedal.

There is a lock nut which you need to loosen first

There is also a connector on the end you need to unplug so you can rotate the switch and remove it.
Before installing the replacement I plugged it in and tested it

The new switch is slightly different to the original one, but is close enough.

The old one had an original label dating to 1994, so it had never been replaced.

It’s just a matter of screwing it into the bracket until the button is depressed, but don’t screw it in hard against the bracket or you’ll probably break it. I wound it in until the button was just completely depressed and then backed it off a turn. Use the lock nut to lock it in place.
Check the lights work, and bam, jobs a good’un.
The final job I had wanted to do was to install a boost gauge so I could check the turbo system was working correctly.
I picked up a cheap second hand electronic Prosport boost gauge (I’ve used the brand before and like the style) and set about installing it.
The electronic gauges have a remote pressure sender, which is mounted in the engine bay. This has a wire that has to go into the cabin to send the data to the gauge.
I started by running said wire into the cabin. This turned out to be really easy, as there was an unused grommet in the firewall, which lead into the cabin.

When you remove the grommet, behind it there is a pre-cut section of insulation on the inside. A quick poke with a screwdriver removed this

The hole in the firewall comes out up to the left of the clutch pedal, which is very easy to access inside the car. I poked a hole carefully in the grommet and fed the cable through

And refitted to the firewall

I mounted the sender on an unused stud mounted on the firewall

The boost reference hose was run to an unused vacuum takeoff point on the manifold

With the sender plugged in, that was that part of the job done

Moving to the inside of the car I found and tapped into a switched power feed under the dash, and ran the ground to the bolt securing the fuse box.

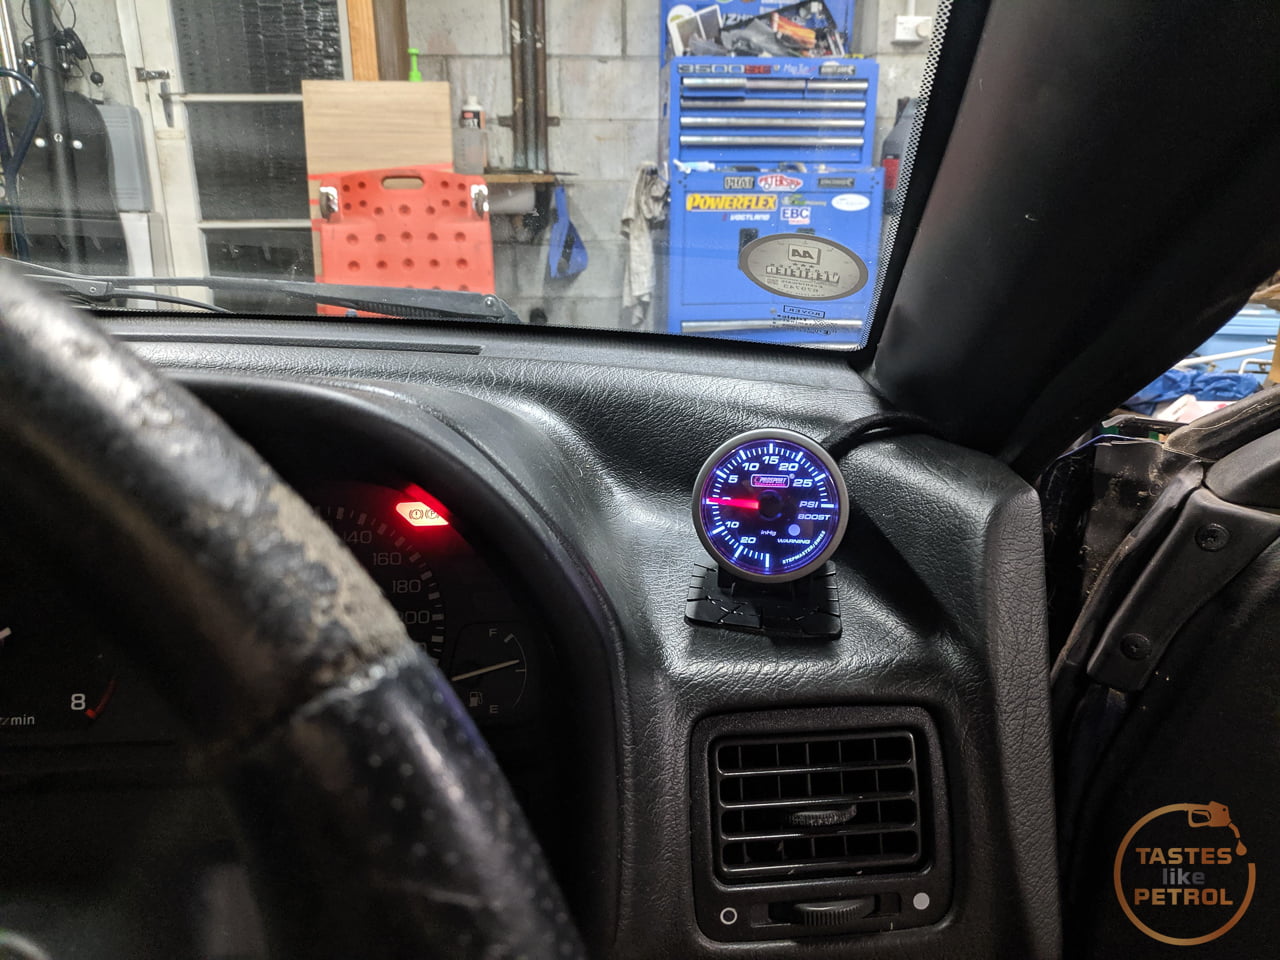
The gauge pod was then carefully placed and stuck down.

I used fabric tape on the wires so they wouldn’t look shite. The wires are tucked into the gap down the edge of the dash and cant be seen.

The view more or less from the drivers seat. It’s tucked down quite low but is in line of sight for the driver. It’s not too obtrusive.

Could look worse. I did want a boost gauge that had a smaller scale so it’d use more of the gauge dial, since these cars are quite low boost (around 10psi), but it was hard to find a good one that was less than a 30psi scale.

On a closed road in Mexico, I can now confirm the turbo system is working spot on. I’m seeing about 9psi in the first two gears and 11psi in the rest, which is expected for this system. Boost comes on really quickly and holds all the way through with minimal drop-off.
The car doesn’t feel fast as such. In first it’s pretty hectic, but second onwards it just gains speed quickly with little fuss (other than the noise). I feel like that’s a Rover thing, and without torque steer and being thrown into hedges it’s all kind of a bit civilised.
I have booked a WOF inspection for the end of the month, and will see how we go from there. Hopefully it’s a pass and then I will be able to drive the car on the road legally and work on fixing some of the other issues.