I can be a bit lazy when it comes to maintaining the daily, particularly when it works fine. Preventative maintenance and I aren’t really on good terms.
The Fit though, needed some. It’s just ticked over 240,000KM and I know for sure the valve clearances were last done… over 100,000-120,000km ago. It’s been a while.
The engine runs fine, but particularly when cold, it does emit a noticeable tapping sound. It’s always done this since I got it at 99,000km, which is why when I got the car, I had the local dealer do the valve clearances as preventative maintenance. It didn’t go well. I went to pick the car up, it barely idled and ran on about 2.5 cylinders. Apparently they got the clearances wrong, so put me in a loaner and tried again the next day. The car ran fine this time, but it still tapped when cold. No, the tech couldn’t hear any tapping…
So a few thousand Km later I take it to a different Honda service center, ask them to check the tapping when cold and to check the clearances. I get it back, no, the noise doesn’t exist, and the valve clearances are fine. Ok, I’ll ignore it then.
Fast-forward many years, many tens of thousands of Km, more experience under my belt, and as part of some other work I was doing to the car now that I have retired it from daily duty, I wanted to check the clearances myself.
Before beginning work, make sure the engine is cold. It’s best if left overnight, but the spec says the engine must be below 38c.
It’s a bit of a messy job, and I was on a timeframe, so you’ll have to make do with some workshop manual images to cover what I didn’t take photos of.
This is a job that requires the cowling to be removed, so it’s also a good time to check/replace spark plugs if you don’t know when they were done last. This guide over here will get you to this point, where the cowling is absent.
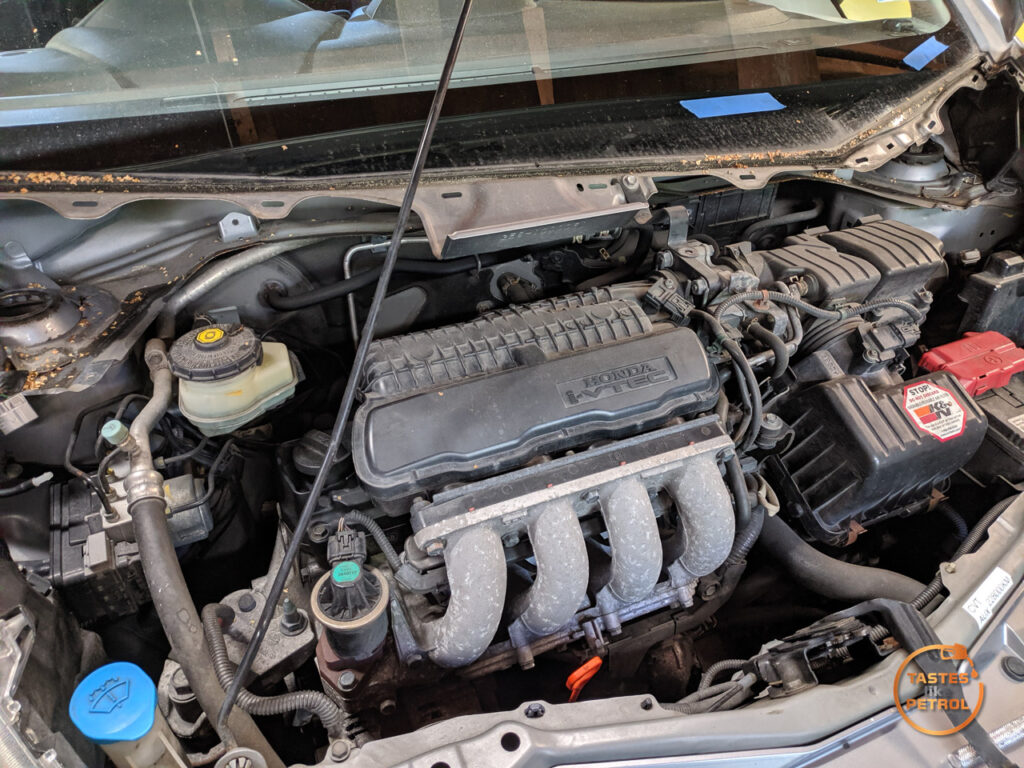
Remove the air filter box/intake next. This can be a pain with the battery still in place, but some wiggling will get it out.
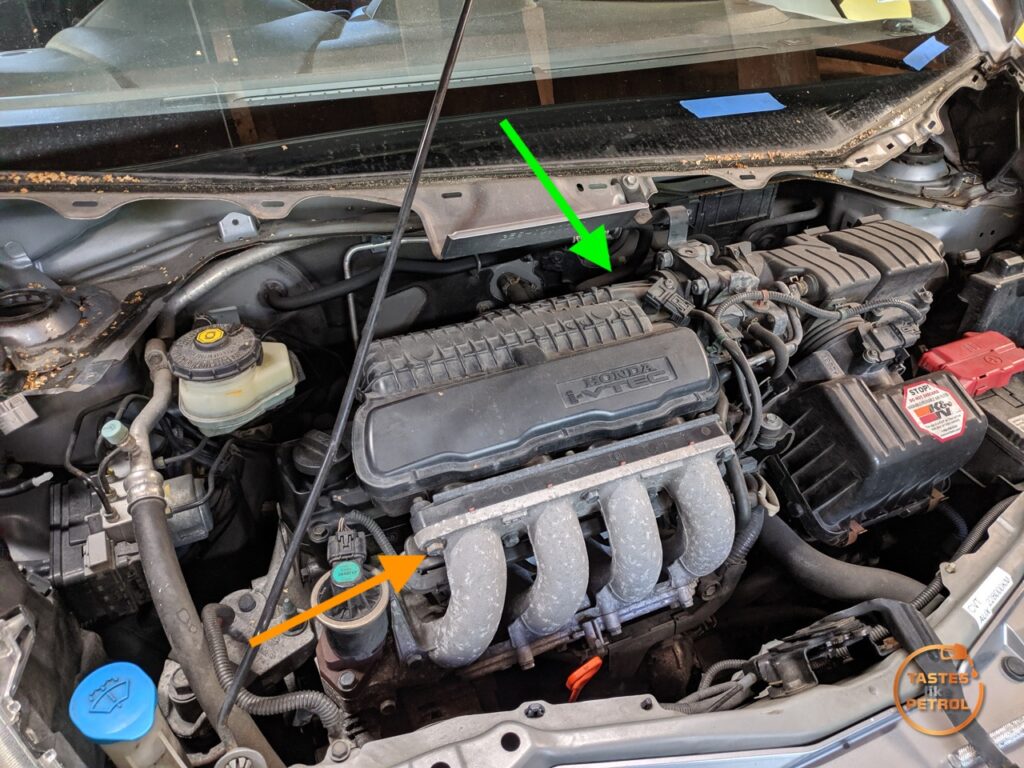
With that removed, you now need to remove the top half of the intake manifold, because it wraps over the valve cover. This is held in by bolts along the front (orange arrow) which join the metal runners and plastic top together. There are also two bolts hidden down the back holding it to a bracket (green arrow), and you will need to remove the four bolts from the throttle body and move it aside. Tucked down the side is one last bolt by the lower LH throttle body bolt. There are a couple of electrical connectors and breather hoses to remove from the LH side of the manifold. Don’t forget the brake booster hose that goes into the back of the manifold too.
Once those are removed the manifold should come out. The gaskets for the metal runners, and throttle body are rubber and should be reusable (mine were fine despite the age/Ks).

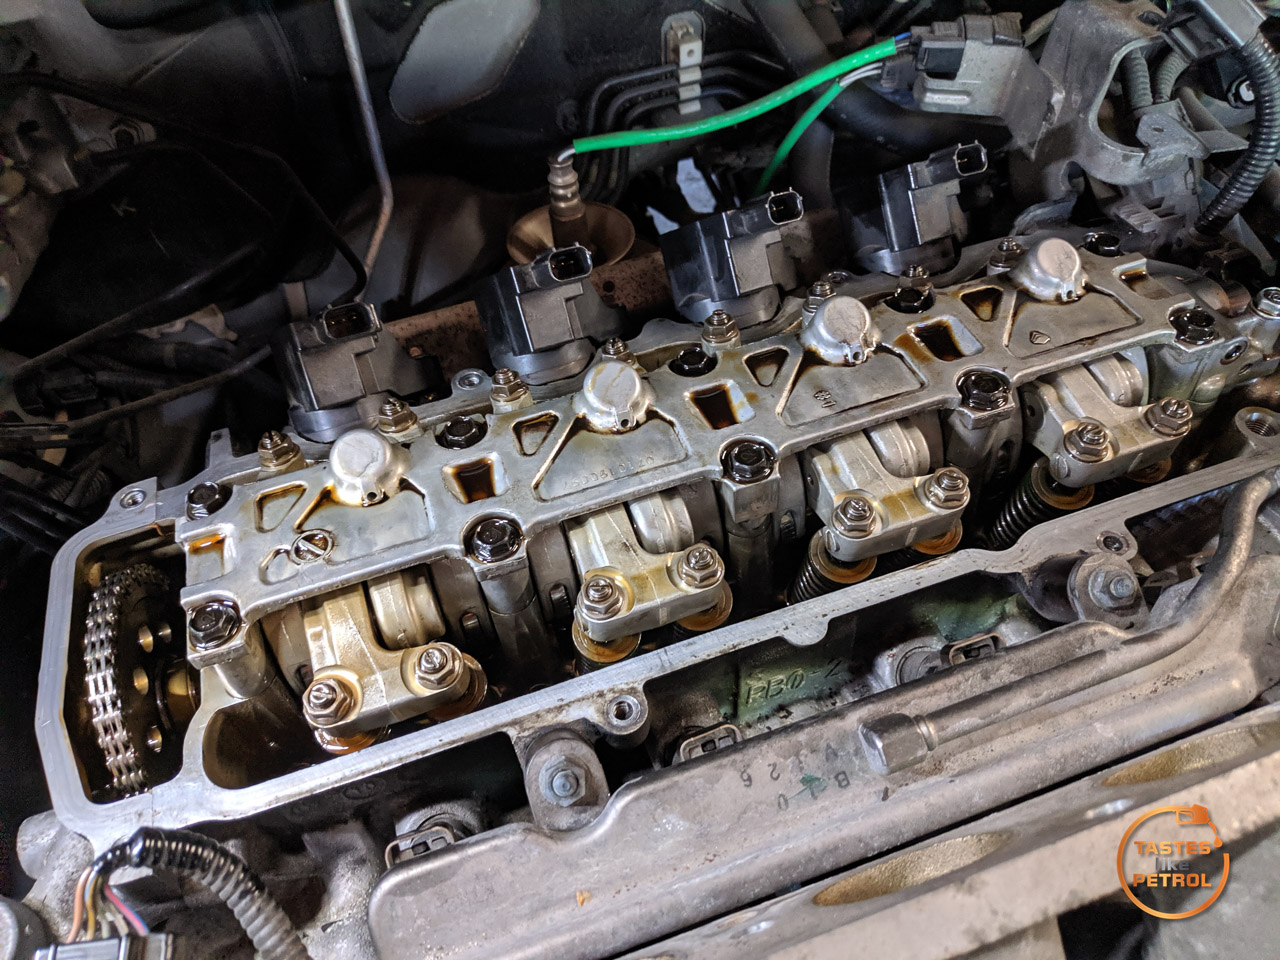
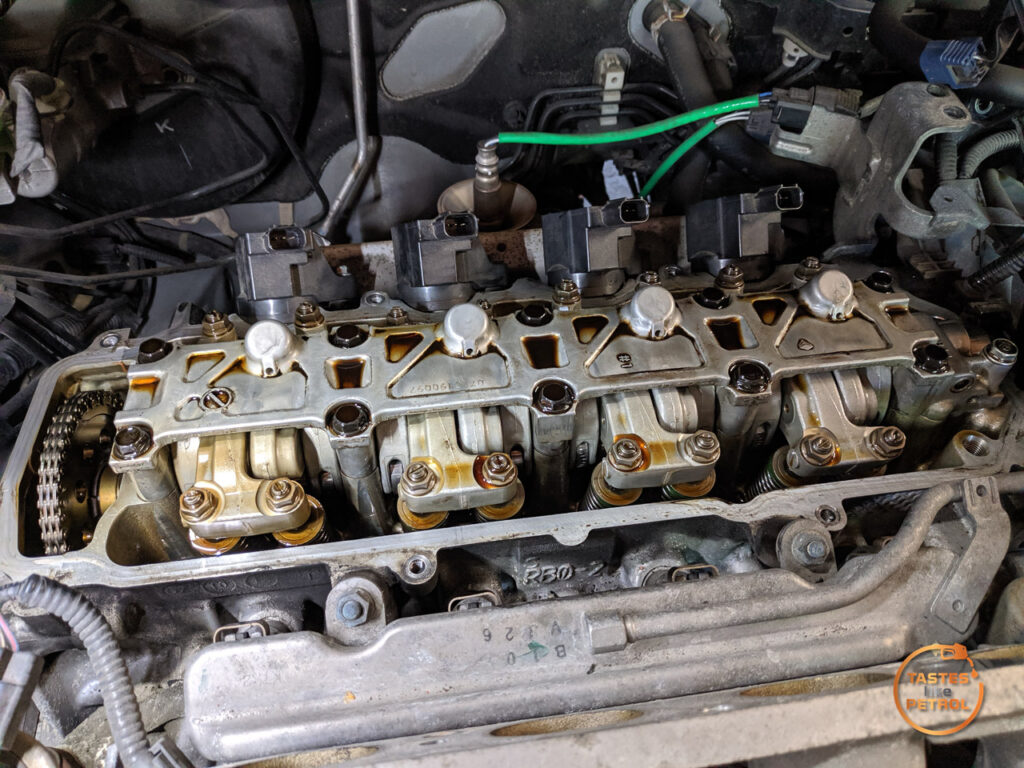
Unclip the coil plugs and remove the harness from the valve cover, and then remove the bolts holding the cover on.
I checked the specs of the JDM workshop manual against the online Euro manual and the clearances were the same spec, so I was safe to use that manual for my JDM L15A7.
The spec for the valve clearances are
Since I already had the car in the air and the front wheels off, it was quite easy to use a ratchet and extension on the crank pulley to turn the engine over. What you’re looking for are markings on the top cam pulley, which indicate which cylinder to check the valves on. In the below example, I would check the clearances on cylinder 2. You can also see the alignment notch to the right of the number 2, just below the chain, this is what you need to align with the top edge of the head.
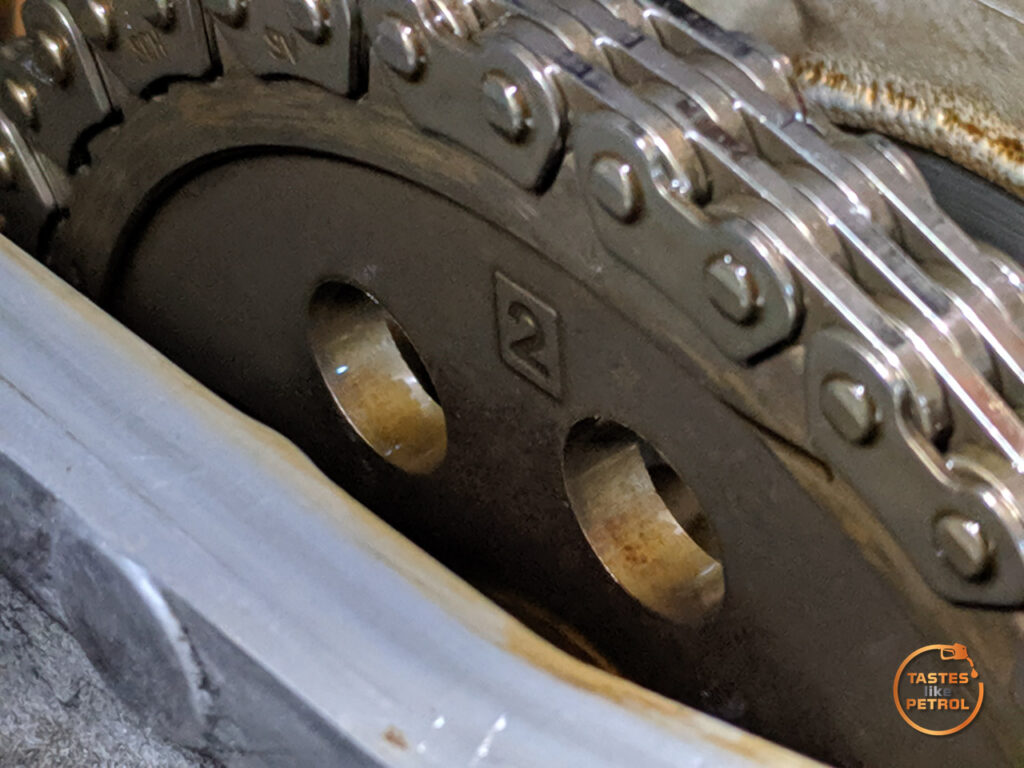
You will want to start with cylinder one though, which is marked on the pulley with “UP” and two horizontal marks to align with the top edge of the head
Since the firing order is 1-3-4-2, that’s the order the cylinders should be checked in. Slowly turn the engine over clockwise, until the next markings line up.
Checking the valve clearances were a bit of a pain. I only have straight feeler gauges, and apparently not quite the right sizes. I found four gauges close to the sizes I needed; one thin and one thick. The theory is that if the thin one doesn’t fit, the gap is too tight, and if the thick one is too loose, the gap is way too big. For the intake I used 0.152 and 0.203 and exhaust 0.254 and 0.305 mm. As long as the gap is between those two sizes, it’ll be good.
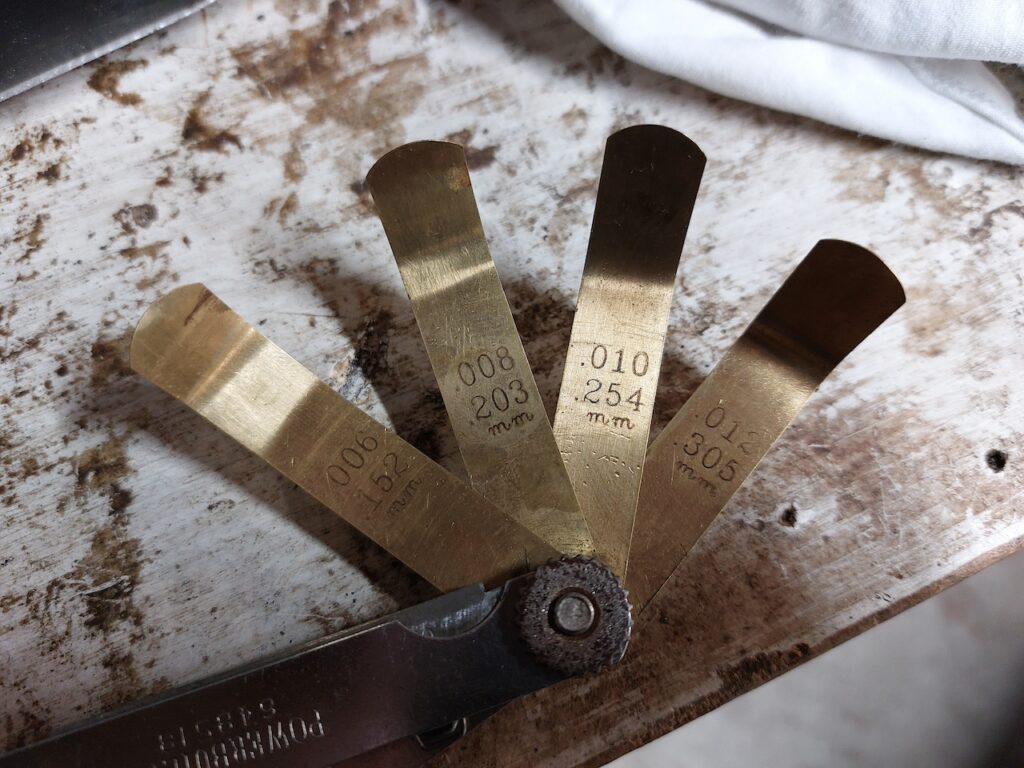
Starting with cylinder 1 intake, I slipped the feeler gauges in between the adjuster screw and the top of the valve stem. Gently sliding it back and forth to feel for drag. If there is drag on the thinner one, we’re good, if the thin one is like a sausage down a hallway, it’s too loose. If it doesn’t fit at all, it’s too tight.
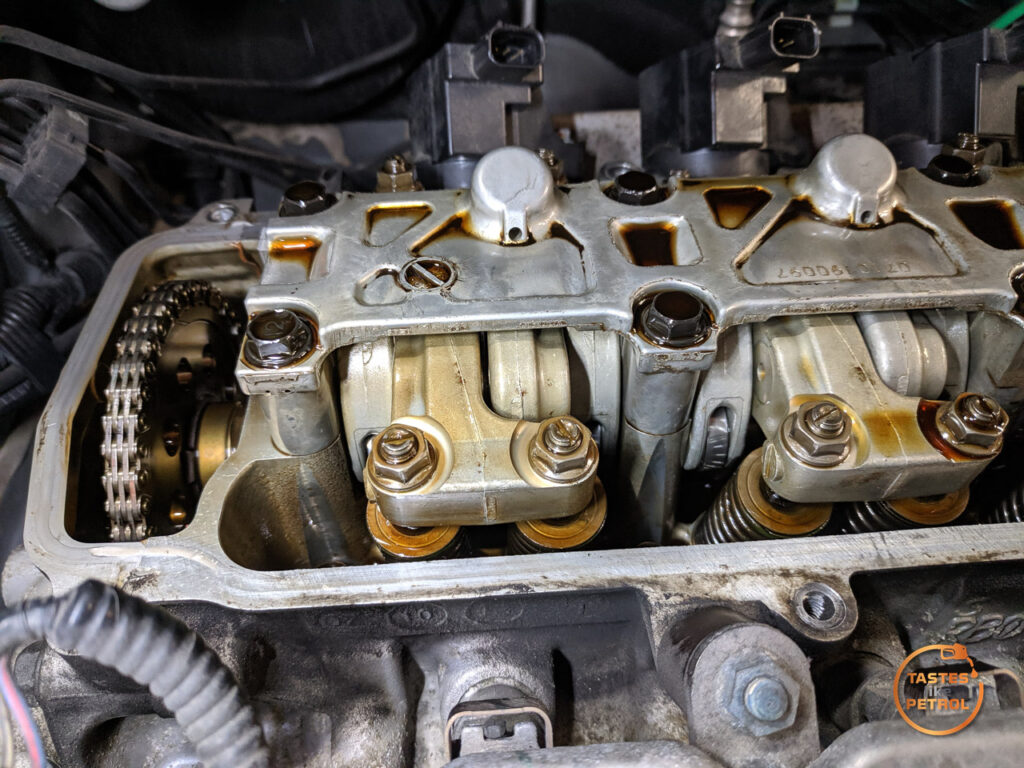
Check and adjust the two intake valves, change feeler gauges and check the two exhaust ones. If any are wrong, loosen off the lock nut, and gently turn the adjuster screw with a flat blade. Righty tighty, Lefty Loosey works here too. Once you get the right amount of drag, whilst holding the screw from rotating, nip up the lock nut. It’s very easy, unless you have the special tool, to slightly tighten the adjustment when doing this, so check thoroughly.
I think all of my intake ones were too loose, and a couple of the exhaust ones were slightly out of spec too.
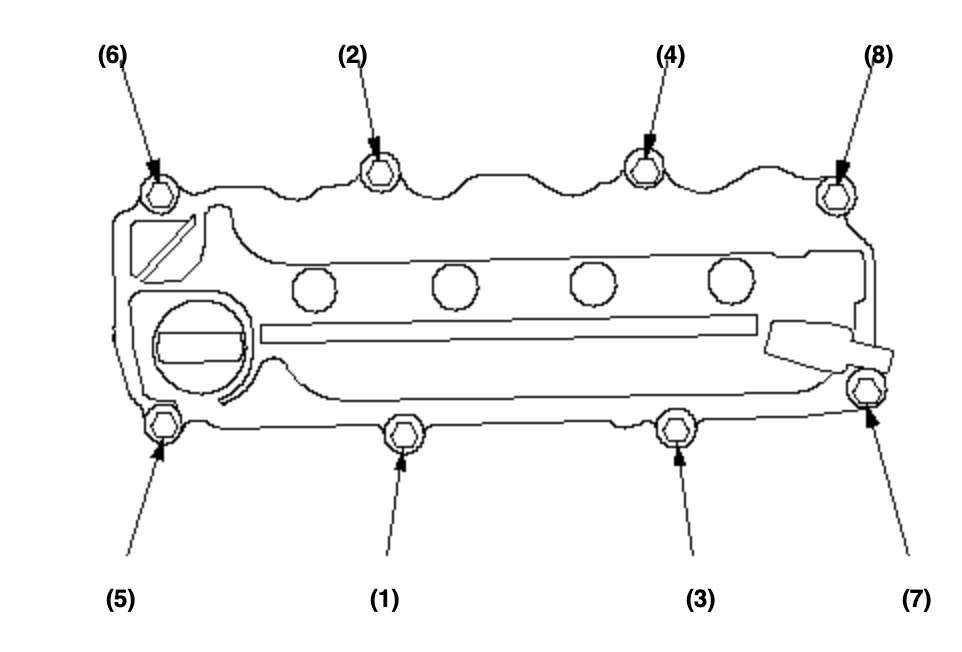
Go through all the valves, for all the cylinders, check all the lock nuts are tight, and then rotate the engine a full rotation and start from cylinder one again, checking all the valves are still within spec. If they are, job done. Clean the surface of the head, smear a little sealant on the gap where the timing cover meets the head, and refit the valve cover with a new gasket, tightening the bolts hand tight from inside out. The spec is 9.8NM but that is so low just nip them up snug by feel.
Check the gasket remained in place, and then refit the intake manifold, intake, airbox etc. Leave the engine for a couple of hours for the sealant to cure, and then before refitting the cowling, start the engine up and make sure it runs smoothly and with no excess noise.
If that’s all good, whack the cowling back on, and you’re done.
The tapping noise is still there when cold, but it’s much quieter now. I’m not sure I have gained any performance, but I certainly seem to have clawed back some fuel economy; at least 0.5L/100KM better than average currently, and that’s with the different rolling radius and sticky tires that I’ll explain later.