Selling the Alto had an interesting unintended benefit; it has allowed me to get the Marina out and use it more since it’s not blocked in anymore.
Using the car more has shown up a couple of small issues here and there. Nothing too major, except the speedo, which decided it didn’t feel like reading correctly anymore.
A couple of years ago I replaced the speedo cable with a nice new one as the old one came out in multiple pieces

The speedo was working fine, albeit reading low, until a couple of weeks ago where I noticed the speedo was starting to play up. Starting from a stop, the speedo was unresponsive until I got a few KPH under the wheels, and then it jumped up to the correct speed and worked OK from there.
The issue got worse the other day, where not only would it take time to jump up to speed from a stop, but it then started to stick at speeds too. I would be cruising along at 50KPH, and if I sped up or slowed down within about 10KPH, the speedo would still be stuck at 50KPH. As soon as the difference was more significant, the needle would jump to the next speed and stick there. This was no good, it’s bad enough working with an old inaccurate speedo, but one that sticks is just not gonna fly.
I did notice that the odometer was still ticking along correctly and didn’t appear to be sticking, and having replaced the cable, I suspected it was binding inside the speedo mech.
Googling Smiths speedometers (the most common design around this age), I learned that the needle has no physical connection to the cable and instead uses a spinning magnet bar inside a metal cup. The magnet creates a magnetic field in the cup, which causes drag on the cup, which turns it and with it, the needle. A hair spring on the needle shaft creates the opposite force needed to drop the needle to zero again.
I read that there are a few points where this mechanism can bind up and cause the needle to stick, so the plan was to strip down a spare speedo and see what’s what, before servicing my actual one.
The spare one gave me an idea of what I was working with, so I proceeded to remove the cluster from the car

As a side note, the Aus speedos use a threaded fitting for the cable, whilst UK ones use some sort of clip.


Before removing the rear screws, you need to remove the glass and bezel first, which is held with three metal clips

The glass and bezel can be removed

The actual speedo is held in place with two screws in the back

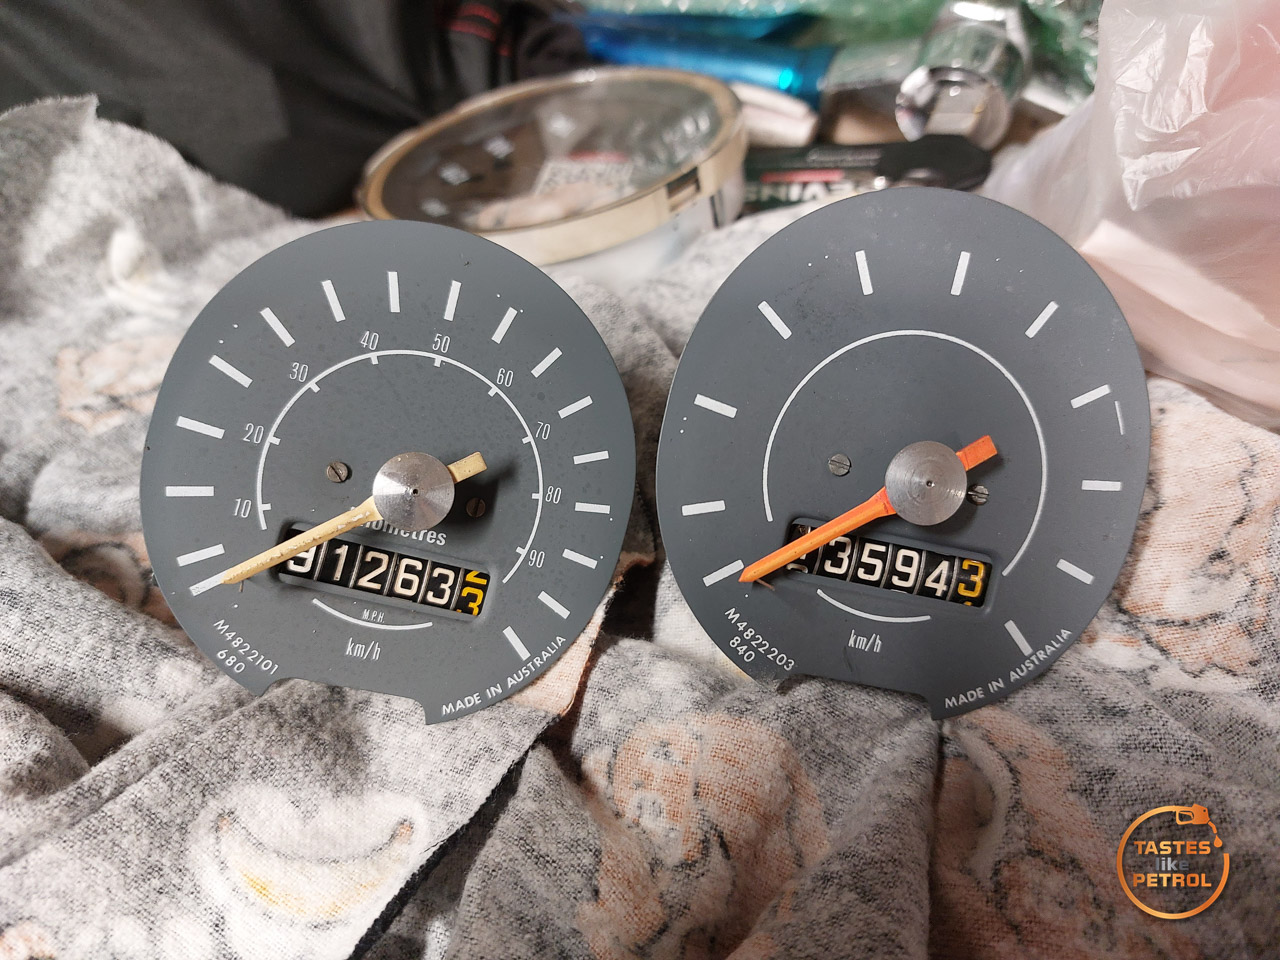
Compared to the spare speedo I have, which I suspect was for a 6 cylinder, the graduations are different and the REVS/KM also differs


The 4 cylinder speedo is 680REVS/KM whilst the (possibly) 6 cylinder one is 840REVS/KM as shown on the bottom of the face, and on a sticker attached to the rear

Having the two side by side showed the issue when I drove both of them with a drill inserted into the cable hole. The “good” spare responded quickly and to small changes in speed, whilst my original one seemed almost dampened in comparison, slow to react and only moving for bigger changes. At least that confirms it’s not the cable or gearbox drive.
Anyway, moving on from nerding out, let’s strip the speedo and see if we can fix it.
First, remove the needle. Much like the tacho, I used some cardboard to protect the face and then a pair of small screwdrivers to pop it off. Make sure to lever the needle on top of the two little screws on the face, as this is the strongest area, otherwise you risk bending the face

With the needle removed, I then removed the pair of small screws on the face and removed the face

The odometer mechanism is quite cool. Externally very simple, although I’ll admit I don’t know what’s going on inside the number wheels to make them turn, but on the outside it has a little arm that is driven by a worm gear, which other than the magnet bar, is the only part actually directly driven by the cable.

The other end of that gear is a little offset cam, which is what moves the arm. The offset causes the arm to move back and forth, and also up and down. As the arm moves down and reaches the bottom of its stroke, it moves towards the toothed wheel, engaging with it and turning it as the arm moves upwards again, which advances the odometer, before again moving away and down. The spring keeps tension on the arm, making it pivot on the body of the speedo instead of just flopping about.

Start by removing the small spring on the odometer mechanism

Followed by the little clip holding the arm on. This is removed by lifting the end of it up, so the hook clears the arm (orange arrow), rotating it slightly so that the hook doesn’t pop back in (green arrow) and then sliding the clip so that the pin moves to the bigger hole (red arrow) and then the clip can be removed

The arm can be removed next. This allows us to remove the four screws on the top plate, which will separate the two halves of the speedo mech

Be careful here, since we aren’t unhooking the spring, you need to lift the metal cup off with the top plate. It’s only retained by the spring, so don’t let it hang, or it can damage it.

This is the magnet bar, which creates the magnetic field to drive the cup. The needle shaft locates in the hole in the center, but this creates no physical drive of the shaft. This recess needs to be cleaned out thoroughly. I used brake clean and a very fine small paint brush.

The other area I found to be in need of a good clean was the drive gear for the odometer, it was caked in dirty, crusty and sticky old grease. You can also see the offset cam that drives the arm, here.

I removed the drive gear (slides out of the body of the housing) and thoroughly cleaned it before refitting with some silicone grease.
Interestingly, I found the actual magnet bar to be quite stiff, sticky and did not spin freely by hand. I suspect this could’ve been the cause for the old speedo cable failing. I hosed this in brake cleaner, particularly around where the cable enters, whist spinning and rotating it. This eventually freed it up so it spun with minimal resistance. Lots of dirty black muck came out with the brake cleaner.
I carefully used some very light oil to lubricate the mechanism. One or two drops under the big worm drive gear, and one at the edge of where the cable enters. I also used a small amount in the recess where the needle shaft sits.
Once I had cleaned up any extra oil and made sure when spun by a drill there was no excess oil being flung about, I carefully reassembled the speedo and refitted it into its housing.
I’ve since been told, regarding the below, that the correct baseline calibration point is to align the needle with the small dot just below the stop (by moving or removing the pointer) so please keep that in mind. I will have to test and calibrate mine accordingly.
One thing to note when reassembling is the tension on the needle. With no tension, the needle is free to just float around and doesn’t care about returning to zero

To add tension, lightly press the needle on the shaft (barely pressed on) and hold the needle down against the stop. Whilst the needle is on the stop, gently rotate the metal cup a small amount in the clockwise direction (orange arrow). This will add tension to the needle.

Add just enough that it drops smoothly down to the stop and stays there. If you add too much it’ll actually create excessive resistance on the needle and the needle will stop increasing with speed as the magnet cannot overcome it. Apparently too little tension can cause some needle bounce at low speeds. Once happy with the tension, press the needle in place.

Initial testing with the drill shows a good improvement, with the needle responding much faster and to smaller changes, much like the spare speedo does. I have only had the chance to take the car for a quick run around the block, but during that drive the speedo responded perfectly, so hopefully it remains working. It’ll also be interesting to see if the accuracy has improved any.
Update – After a quick test with my GPS, I can confirm I made the speedo no more, and no less accurate than it was. It still reads exactly 10KPH under, but the response of the needle to speed changes is significantly better than it was. I would suggest using the calibration dot mentioned above, but in my case I guess my “by feel” calibration was good enough.
