One thing I have been chasing since getting this car is backlash and thumping from the rear diff when coming on and off throttle or changing gear; I finally sorted it.
Cleaning the throttle body and changing the gearbox oil had helped a lot in driving smoothly, but there was still what I would consider too much thumping and backlash in the driveline when coming on and off the throttle. Driving slowly in start stop traffic was pretty terrible.
To try and combat this, I ordered two sets of inserts from Whiteline; A gearbox mount insert and a rear diff mount insert kit.
I started with the gearbox mount insert. I was going to order an STI mount to replace the stock one, but decided on the Whiteline insert mostly based on cost.
There isn’t much to it, it’s literally a moulded piece of polyurethane that gets installed in the mount, to take up the voids in it.

The instructions call for completely removing the cross member and mount, but the internet said I could install it much easier with just some careful jiggery-pokery, and the internet is never wrong.
This guy here is what we are working with. The insert goes into the gap shown by the arrow, which allows the insert to take some of the weight/force, instead of just the two blocks of rubber either side of it.

I found since my mount has about 190,000km on it, it had compressed enough that I needed to jack the transmission up, this was done with a bottle jack and a couple of blocks. I did have to remove the rear black undertray to access the bottom of the transmission.

This is the only bolt you need to undo to fit the insert. It goes through the bottom of the mount, to the flat square block of metal in the above photo of the mount – Its kinda T shaped.

Once the nut is removed you should be able to push the whole bolt upwards by hand. This is how you slip the insert in. I jacked the transmission up until I had ample space in the mount

Thoroughly grease the insert with the supplied grease and then using one hand to hold the T bolt up and out of the gap in the mount, use your other hand to slide the insert into place.


Orientation of the mount is a little unclear, if the Whiteline wording should be visible from the front or rear, but as far as I can see it makes no difference, and I’ve seen others install it both ways. The instructions say to “slide the insert into the rear of the mount”.
Slip the centre bolt down through the insert, lower the trans down, refit the nut and then torque it to 40NM. To stop the T of the bolt twisting, I jammed a flat blade screwdriver in between the metal and the side of the mount.
Job done. Quite easy to do when you don’t need to drop the whole crossmember. I’m not sure why they say to.
While in the area, the next part to install was the FactionFab rear shift carrier bush. This is another polyurethane replacement.
It’s a big, solid unit and comes with new bolts

The old mount is held in place with two bolts. To gain better access, since it’s a bit limited up there, I removed the two bolts off the driveshaft hanger bearing, and let the shaft droop down.

This gained me just enough wiggle room to get a spanner up there and undo the bolts

Using two hands, one on either side of the mount, wiggle and pull it backwards to remove it. It’s a tiny little thing compared to the replacement. The rubber is very soft.

Grease the spigot on the end of the carrier, and then wiggle and slide the new mount into place. Refit it with the two new bolts, bolt the driveshaft back in, and you’re done.

The difference in these two changes was quite noticeable. More direct shifts, less play in the shifter, and much better feel. I think most of it was the mount insert, but the carrier bushing can’t hurt to do.
Moving to the back of the car, I had high hopes for the rear diff inserts. These, like the gearbox insert, are designed to fill voids in the stock mounts and stiffen them up. The kit includes two inserts for the rear mounts, and two sets of inserts for the two front mounts.

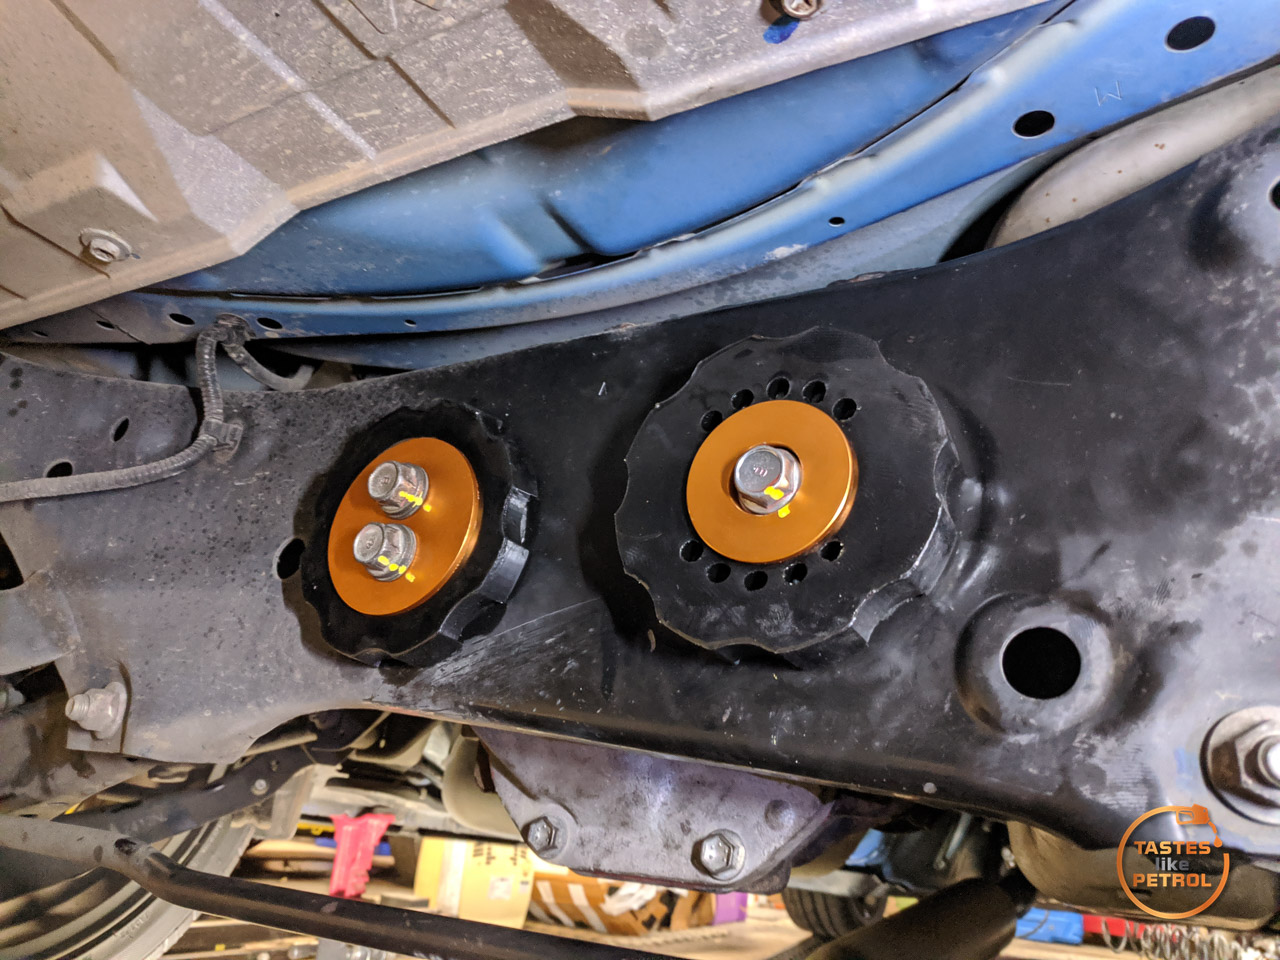
These are the front mounts, bolted vertically up to the subframe

And the two rear mounts (foreshadowing…)

I started with the front mounts. Using a jack I took the weight of the front of the diff and removed the bolt from one side


The first part of the insert is a ring that slips over the top of the mount. Remove the metal cap sitting on top of the mount, pop it aside, and then offer up the ring. This needs to be worked slightly so that it hooks under the centre of the mount and wraps over the side. The ring is the shiny black part between the diff and subframe.

Don’t forget to refit the metal cap on top, this kinda just sits there in place, on top of the ring.

Next is to fit the lower insert. This pushes into the centre of the mount and has two notches in it that locate on the protrusions in the bushing. The lower plate will locate in the bumps on the insert.

Rinse and repeat for the other side, and that’s the two front mount inserts done.
Now, the rear. This is where it all turned pear shaped.
First, remove the rear swaybar D bush mount brackets so you can move the swaybar to get more room

This should give ample space for removing the bolts on the rear mounts. Do one mount at a time. I started with the RH one and soon found an issue. The bolt was really deeply recessed into the mount.

I removed it and noted how weird the mount looked. It wasn’t what I was expecting.

There was zero chance that the insert would fit, the whole design and shape of the mount was wrong. Going by the paint pen X under it, I suspect the car failed compliance on a bad bush when it arrived in NZ, and to get it through the workshop fit whatever bush would fit the hole. It looks a bit like an IS200/300 bush from my googling, but definitely not the right one.
It should look something like this, on the right, fitted to the subframe

Anyway, the LH bush looked fine, so let’s do that one. I removed the two bolts, greased the insert up and slipped it into place

The alloy plate goes on and the bolts refitted.

After torquing the bolts up, this is where I left it, since I couldn’t do the other bush until I sorted a solution.

The solution ended up being me ordering a new genuine bush from Japan, knocking the incorrect bush out, and fitting the new one with the insert. Easy, right?
The bush arrived quickly, so the BRZ went up on axle stands

New genuine bush and correct bolt

The mount is vastly different from the currently fitted one

I knew I wasn’t going to be able to get the new bush in with the muffler fitted, so that had to be removed first. The bolts were a bit crusty, but heating them up nice and hot with a heat gun, soaking them in CRC and then a couple of ugga duggas got them off without issue.


Unhooked from the hangers and removed. Tons of space now.

I removed the swaybar mount brackets again and removed the centre bolt from the bad bush. Classic Bunnings bolt, a little different from the correct genuine one.

I wound the new bolt into the diff, just to check the threads werent damaged.

All was good, so it was hammer time. I’ll tell you what, spending about 1.5 hours under the car swinging a 1.5KG hammer upside down above your head with limited room, is probably one of the worst jobs I have done in a long time. My arms are killing me now.
I was using a combo of 1/2″ extension bars (which will never be the same again) and a couple of long bolts, to hammer on the edge of the bush. There isnt a heck of a lot of room around the diff to access the bush.

After many whacks, the bush finally started to shift


The problem was that because I could only access one half of the bush, it kept trying to come out cocked on an angle and then getting bound up. To address this, I actually removed all but one of the bolts in the rear bush of the diff, which I loosened, and then lowered and shifted the diff across. This gave me more access to the other side of the bush.

With the extra access, I managed to get the bush out straight to a point where I couldn’t drift it out any further due to the inwards facing flange on the subframe. The trick here was to move to the other side of the subframe and start hammering the bush sideways back and forth. A few good whacks and the bushing just fell out.

Comparing the two bushes, well, yeah. No wonder the diff banged around like it wasn’t supported… it kinda wasn’t; all the force would be acting like a big lever on the bush since it was only supported at the very outside edge of the bush. That bush couldn’t have been doing anything once some torque was applied to the diff.


The correct bush supports the diff through the whole length of the bush.
Refitting, in comparison to removal, was very easy. I lined the bush up in the hole, with the locating arrows facing straight up and down, and then using a mallet knocked the bush home until the centre tube was touching the diff backplate. Using a ruler, I checked the bush was square in the subframe and tweaked as needed.


And now, I could finally install the Whiteline insert for that bush. What an ordeal.

Everything was torqued as per the Subaru manual

As a slight side note regarding the front inserts on the diff, I had heard these can introduce gear whine at certain speeds, and unfortunately I can confirm this was the case. Having them fitted introduced a noticeable gear meshing whine at a couple of different road speeds, mainly around 70KPH and 100KPH, which sucks, since that’s where most of my commute usually is.
You would get used to it, but I hate noises like that, so opted to remove the two front mount inserts completely and only run the rear bush inserts.

The result is no more gear whine, but most of all, the thumping, banging and backlash from the rear diff is gone. Finally, everything seems to be connected together, and it’s a lot easier to drive now. I can’t be 100% sure what was the inserts and what was just having the correct bush fitted, since I never drove the car without the inserts and the good bush, but either way, I’m happy.
If they had just fit the correct bush in the first place, this job would’ve been done and dusted ages ago, but no, previous owners have been living with it like that and thought nothing of it.
As a little bonus, it would be rude to have the rear muffler removed and not start the car, right?