When I got the car, it had this weird heater valve on it that didn’t work, oh and it leaked. That was no good.
I haven’t quite worked out what this heater valve was from, but I suspect it pre-dated the car by a while. It didn’t line up with the cable, and there was a steady leak from the top of the housing

I got a replacement standard style valve from Minispares with my last order.

Like an idiot though, I somehow forgot to buy a gasket. Oops. I smeared some sealant on the face of the valve and used that to transfer onto the gasket paper, so I could cut out a new gasket

Of course it wouldn’t be one of my cars, or British if it didn’t do this

Thankfully that particular spill was planned, unlike a couple of later ones. I removed the two nuts that held the old valve on, and removed the hose clamp. The old valve came off easy enough, as did the gasket (yes, woah, an actual gasket?!)

I thoroughly cleaned the mounting face, smeared some sealant on the gasket and on went the new valve. Shiny.

Now, you can see one thing I did wrong in the above photo. A: the heater cable is bent at the end so doesn’t push in further, and B: that metal part in the clamp shouldn’t be there…. but I didn’t realise this was wrong until I fit the replacement heater cable.
This is what the cable should look like. It takes some fiddling when fitting to get the correct amount of travel.

The heater valve now works from the pull lever inside the car now.
One other coolant related issue I had noticed with the car was that there always seemed to be some coolant on the block below the thermostat. I finally traced this down to a weeping thermostat housing gasket. It’s hard to see in the photo, but obvious in person

I thought to myself, “oh, this will be a quick job. Just pop the housing off, make a new gasket and away we go”.
It didn’t go like that.
The first warning should’ve been when I took the top hose off and saw the damage to the end of the thermostat housing and how brown it was in there.

I took off the three nuts on the thermostat housing, and the two on the radiator, removed the bracket and then tried to remove the thermostat housing. It wouldn’t budge.
After MUCH abuse with many tools, it finally started to shift. It turns out the front stud was corroded into the housing

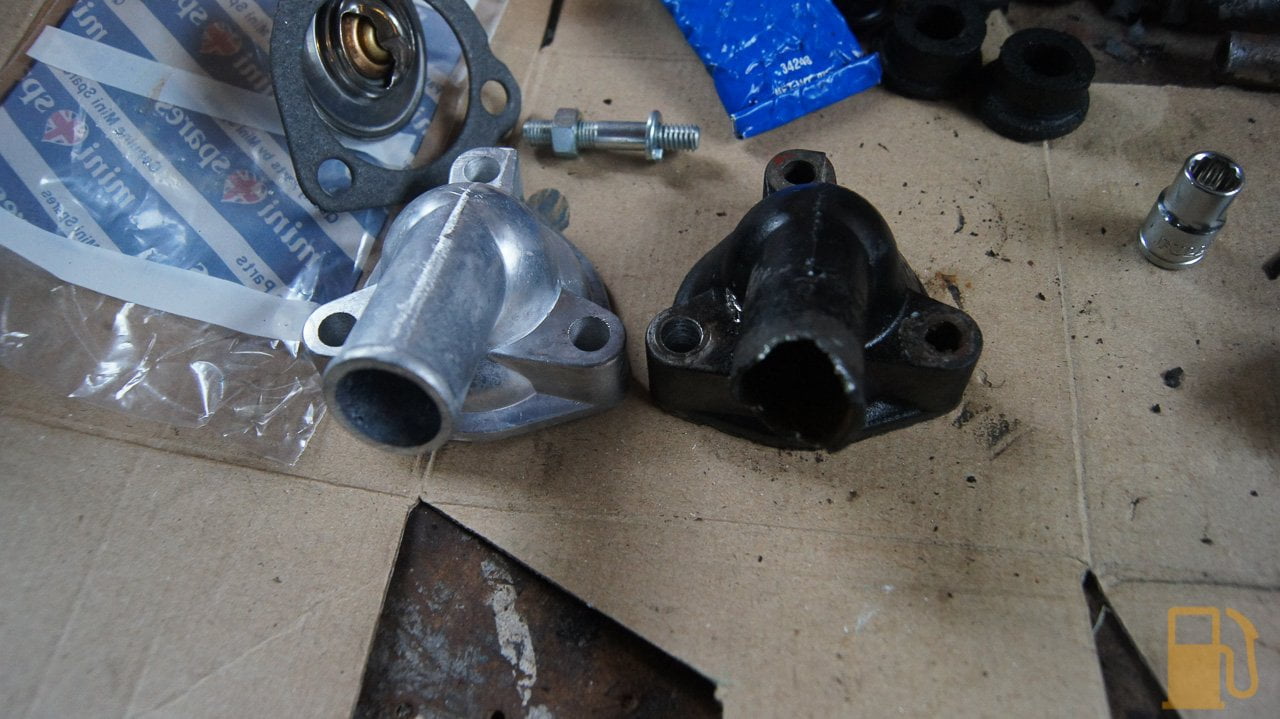
Unfortunately the stud didn’t survive the job, so I had to source a replacement. Once I saw the thermostat I was a bit suspicious of that, and a quick test showed that it was very sluggish to open. A new one of those, a gasket and a new thermostat housing were sourced.


The new housing shows how much was missing from the old one

I used the double-nut method to wind the new stud into the block, with a generous coating of copper grease on the threads. I also greased the actual studs, in the hopes they wont corrode to the housing again. The other two studs were OK to reuse.

On went the new gasket

The new housing looks much nicer.

I topped the coolant up, but I’ll need to actually run a flush through I think. There is a fair bit of brown crud in the system. I probably need to try a CLR-water mix flush to try to remove some of that corrosion in the block, but that’s another job for another day.
Parts Used
ADU9102MS – Heater Valve
88G221 – Heater Valve Gasket
JFF10003 – Heater Cable
GTS104 – Thermostat
12G103 – Thermostat Housing
GUG705558GM – Thermostat Housing Gasket
CHS2514 – Stud
GFK1114 – Washer
GFK3212 – Nut
Please note these parts are specific to my car and may vary. Please check before ordering.