
Wow, it’s almost been a year since Part 1, this project really has been on the back burner.
To be fair, a lot of other projects have come and gone in the meantime, and one in particular (not naming names, Lucas) has taken up months of my time, space and money. That has sucked, when all I want is to drive the Marina.
Well, its a new year, so Happy New Year and all that, and 2023 is the year the Marina will be back on the road for the first time since about 1996.
Anyway, it appears I missed an update. Months ago, back in May 2022 or so, I did actually move onto the Drivers side floor, starting with chopping the whole damn thing out. I decided on this side that instead of doing smaller patches, I would just replace the biggest sections I could. This was the right choice, it’s so much easier.
Just as a note, this side has the fuel and brake pipes running under it, so I used a block of wood to space these off the floor so I wouldn’t cut or heat them.

I started making up some patches

Everything got a good going over with the flappy wheel of death, and the first patch was started. There were dozens of holes to plug weld to the underfloor supports.

After much plug welding, the first patch was welded in

The sill patch followed. More plug welds, and welding to the inner sill. This had a couple of different angles I needed to match, as the floor slopes upwards at the rear.

I was obviously happy about having some progress after a couple of months of nothing

A month or so later, the final patch was welded into place

A grinder and paint made me the welder I ain’t

And with that, the RH side was seam sealed. I still had some touch-ups to do on the LH side, so that hasn’t been sealed yet. I did this months ago, so it’s pretty dirty now, like the rest of the car.

There we have it, the floors are more or less done.
Due to all the other projects needing work, this was left untouched for a couple more months, until finally, I had nothing else in the garage and dug deep to find some motivation.
It was finally time to address the rather perforated LH sill, as it was never going to pass a WOF in that state.

I had been putting this job off because it’s a big lump of pretty serious work. It needs to be strong, and it needs to look tidy. It was daunting.
I purchased a sill panel months ago from a seller down south that custom makes them on professional rollers, so at least I don’t need to try and make my own panel.
My workplace is on a shutdown over the Christmas period, so what better time to get off my butt and get chopping?
And that’s just what I did.
First, the LH door has to come off. This is easy, six nuts on the hinges and the whole lot comes off. Not even a single cable to remove from the door.

Thankfully the A-pillar area is in PERFECT condition. I have seen some shockers in the UK for rust here.

I got out the air saw and started the cut. I used some spare box section to brace the door aperture, just in case.

I needed to keep that first top step so I could weld the new sill to it.
Opening the sill up showed just how crusty it was. It was packed with rust flakes


I vacuumed the chunks out so I could see what I was working with

The air saw once again made short work of the bottom of the sill


I then used a combo of a sharp dill bit, a flap disk, a grinding disk and a flatblade screwdriver to break all the spot welds for the lip that was still attached. I used a flap disc to take that paint off and expose the spot weld locations, which I then drilled until there was a definite indent. I then finished it off with the grinding disk, until I could lever the strip with the screwdriver and break the spot weld. Some of the factory spot welds were… a bit askew, and barely on the inner sill at all.


I do have one of those fancy spot weld cutters, but it’s shite. No matter how much I punch or drill first, the damn thing just wanders all over the place instead of cutting around the spot weld.
The inner sill looks worse than it is. There was a hole at the very end, and I found another weak spot that failed the poky-poky-screwdriver test.


The rest of the sill faired well and is just covered in surface rust and some pitting.
I started with the small hole near the seatbelt anchor bolt. I cut the area out

And then decided the pitting to the right of the hole was looking at me funny, so cut that out too

An appropriate size patch was made up and welded in (excuse the shiny photo, this was after I had covered everything in Brunox)

As you can see above, the rear of the sill was also cut out. I chose to overlap this on the jacking point, for some extra strength.

Before wrapping up for the night I wire brushed everything and gave it a couple coats of Brunox, which is an epoxy rust killer. I’ll tell you what, once set it’s like brown stuff on a blanket, really hard to get off.

A couple of days later, I set off to the garage with a plan; Cut the bottom of the rear quarter panel off so I could access the inner sill step, which I would need access to when I weld the new outer sill on.
For once I was smart, I thought “hey normally I just cut and away I go, but today, I will grind back all the paint so I have a nice clean surface to work with around the cut”. It didn’t go to plan.
I started grinding away and immediately struck bog. Lots of bog. Damn.

As it turns out, the whole lower area ahead of the arch was made of bog

Even the arch “lip” was bog

This wasn’t your usual repair, using something to back the bog where there is a hole. Oh no, this was “stuff the hole with bog until it’s solid”. In the middle of the circle, someone had torn a hole, folded the edges back and filled it with handfuls of bog (you could see it looking down inside the inner guard, I missed it the first time though).

Something had hit the arch, bent it in, and left a nice dent. Instead of fixing it properly, that’s what they had done.
Initially, my brain just fell to bits, my whole plan was derailed and my toys weren’t in the cot anymore. Eventually, there was nothing else for it; get cutting.
I dug the rest of the bog out, cleaned a bigger area of the panel back, marked a couple of lines and got cutting.

Inside, it wasn’t bad. The arch lip was bent and twisted

But the rest of the area was fine. The damage is mostly contained to the small section of guard that I removed

The piece I removed was pretty ugly


I don’t know how yet, but somehow I have to remake that, including the arch section missing from that piece. It might look basic, but it’s got a couple of different angles and a body line in the middle of it. Guess it’s time to watch some more YouTube.
Otherwise, removing the small section at the bottom of the guard did give the access I was hoping for

The plan now was to keep moving, and doing what I had intended to do; fix the inner sill and fit the new outer sill. Once that’s fitted I can work on the missing section of guard.
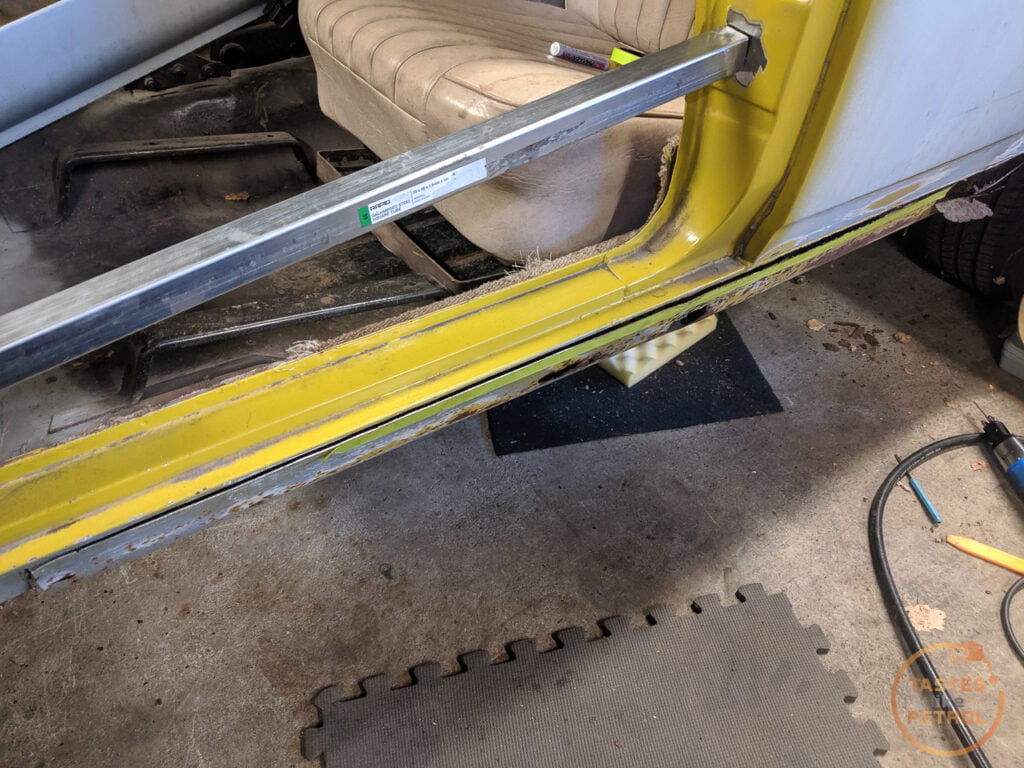
As a quick morale booster, I offered up the new outer sill to see how it fits


It looks like it should fit quite nicely with some trimming.
I welded in a new section for the rear of the inner sill, and make a little piece to replace the upper stepped section I had to remove due to rust

And that’s where I have ended for today. I gave everything a coat of weld-through zinc primer, and the next step is to make the outer sill fit properly, and weld it in place. It would be exciting if it weren’t for the rest of the work that still needs to be done.


As they say, it’s got to get worse before it can get better. I hope it gets better. God I hate bodywork.