In my last update, I pulled the seats out, carpet up and fixed the rust in the floor/interior. Now it was time to put the carpet down, reinstall the seats and work on the rear rust.
Before I could reinstall the interior, I really wanted to give it a good clean, so I pulled the Big Green Machine from its hiding place in the basement

This guy is a beast. Heaps of suction and a heated solution sprayer. It’s better than my favourite Little Green Machine for cleaning upholstery, but its size and weight mean that it doesn’t get used anywhere near as much. It’s more for cleaning house carpet than car seats, but it does the job.
I put the carpet back in place and gave it a good vacuum with the shop vac to get the loose stuff off it

And then I got stuck in with the cleaner. So much forbidden coffee was sucked out of the carpet

It’s not perfect, but it came up a bit nicer after a few passes. It’s a bit more blue.

You can kinda see the difference here, compared to the untouched driver’s sid,e which has more of a brown tinge

So, of course that side got some work too, pulling more mystery juice out

A slight difference from how it was before

The carpet is pretty thin and a bit worn on the driver’s side, so eventually a set of nice carpet mats will go in, but that’ll happen later.
This is the liquid I removed from the carpet

Now that the carpet was clean and smelled better, it was time to pop the seats out of the boot and back where they belong

I didn’t do it on the day, because I was stuffed after doing the carpet, but a couple of weeks later I did give the seats a good clean with the Big Green Machine too, and they came up much better (and smell better)

Let’s not forget the interior looked like this at the auction


I think the previous owner had wiped the seats down, but not really cleaned them, as they too were full of forbidden coffee juice

I’m pretty happy with how they have come up, including the rear seat. I might give them another going over once the car has been used a few times and the dirt has been shaken around.
Now that the seats were out of the boot, I moved the speaker shelf out of the way, folded the rear seat and moved all the boot lining out of the way

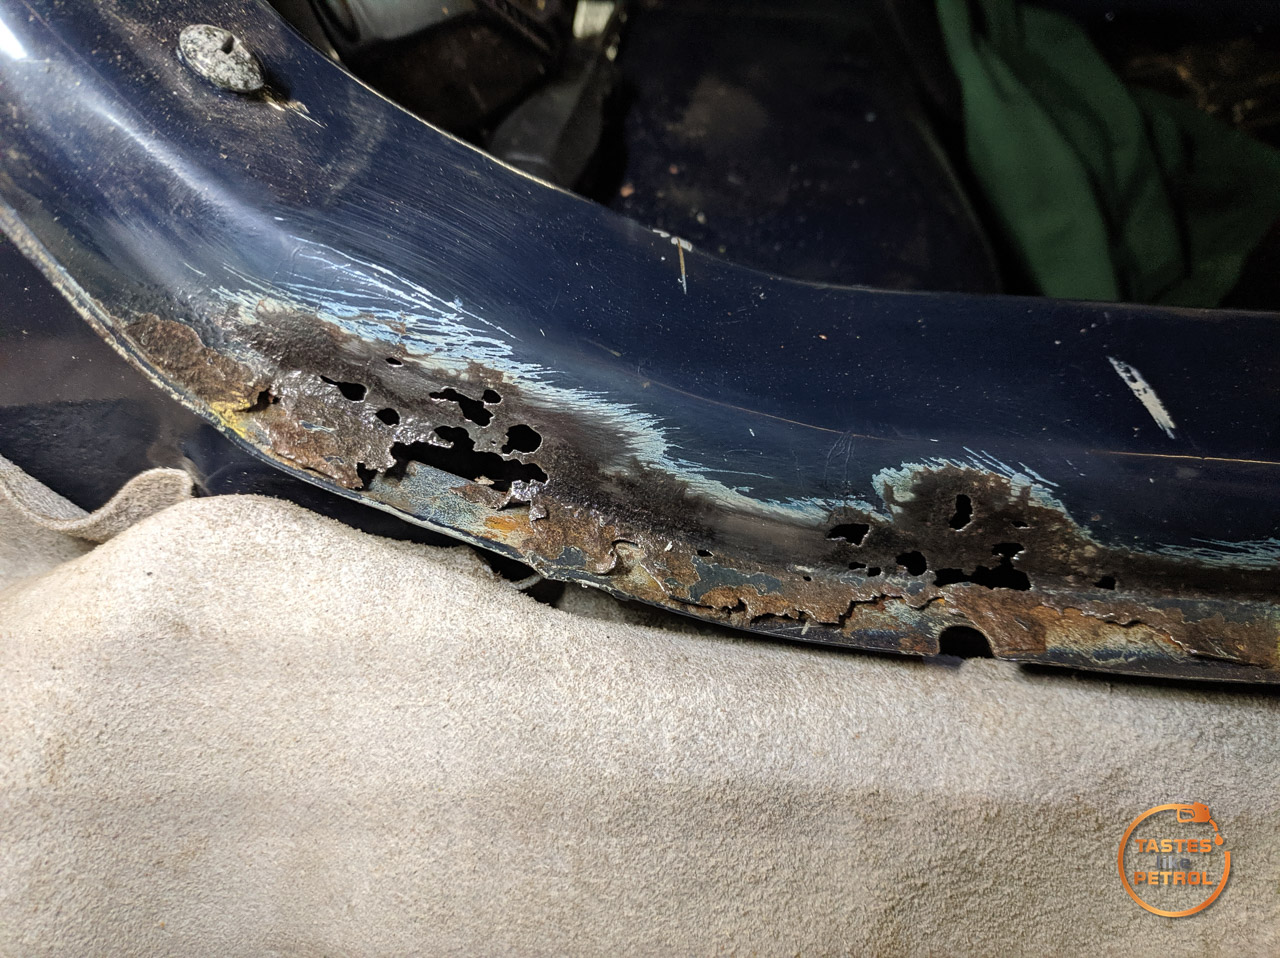
This meant I could safely work on the rusty boot seal lip. I started by wire brushing the area, and boy did it not get any better! No wonder it leaked!


I started by making up the repair panel, using my cutter/folder. This strip was at the limits of what this little machine can do.


Followed by my new toy, a shrinker and stretcher. I should’ve got these when I was working on the Marina, they make shaping metal so much easier


Which gave me a strip of metal with the basic shape I needed.

A bit more tweaking and it was pretty good.

Next, the cutting wheel and chisel were used to remove the bad metal. Thankfully, the lower lip was in very good shape, so I could just peel the top lip off it and be left with a good flange to work with


I tried to remove the rear bumper, but the fixings are all Philips head screws, super tight, and all seized, so that’s a job for another day. I did my best to cover and protect it as I went.
Next, I trimmed the patch down and metal-glued it in place

I trimmed it all up nicely, plugged the holes on the other side of the opening and then primed the whole lot with epoxy primer

Once the primer was cured, I then used seam sealer to seal it all up. It’s more than you should probably use, but this is a “wet” area, and I don’t want to risk any water ingress through a pinhole in a weld that I missed or anything. The seal covers the majority of this. I also seam sealed the back of the joint, inside the car.

Finally, once the sealer had cured, I painted it with an epoxy topcoat. This is durable and a rust inhibitor. If the exposed boot ledge gets scratched up, I will likely wrap it in carbon vinyl or something.

It looks a bit nicer without all the junk in the trunk, and the seal cleaned and refitted

It could do with a skim of filler over the welds if I were picky and chasing perfection, but for now, it’ll do. I also seam sealed the complete boot opening, since some of the old sealer under the boot seal had perished or was just gone, so hopefully that stops any moisture tracking in under the seal.
That’s the end of the welding. I have a couple of small areas of cosmetic corrosion to fix up in a couple of places, but since they are in the middle of a panel, and aren’t structural, they’ll get treated and then touched up with some filler instead of risking warping a panel with weld.
One of the other interior things I hated was the sun-damaged and gross-looking steering column shrouds. You can see them in the photos above, a pale, flaky grey that was scratched to death.
I originally tried to scrape all the dead plastic off, making a mess in the process. The idea was to paint them and hope they would come back, since the genuine ones were obsolete.

It turns out the later C chassis Alto (CR and the likes) have slightly different covers, but are basically the same. The difference is, they are available new, and even better, they are available second-hand in good condition (in Japan), so that’s what I did.

There is a slight difference in the shape around the ignition (the bump is longer), but it all still fits together nicely

Makes a nice difference


Progress on the engine has been happening in the background in fits and starts, with many issues in the meantime. That’ll be covered in another post soon. The goal to have it running over Christmas is probably not going to happen now, but I have plenty to get on with in the meantime.