The big rebuild has kicked off, but it’s the kind of kicking that also includes screaming.
In the last update of the engine, I bought the Cappo engine, stripped it down and got it ready to be sent for machining.
The basic instructions were for them to skim the head and block for the metal headgasket, and to hone the bore on the block, ready for new piston rings on standard pistons.
I also had them clean both, which resulted in them coming back looking very good.

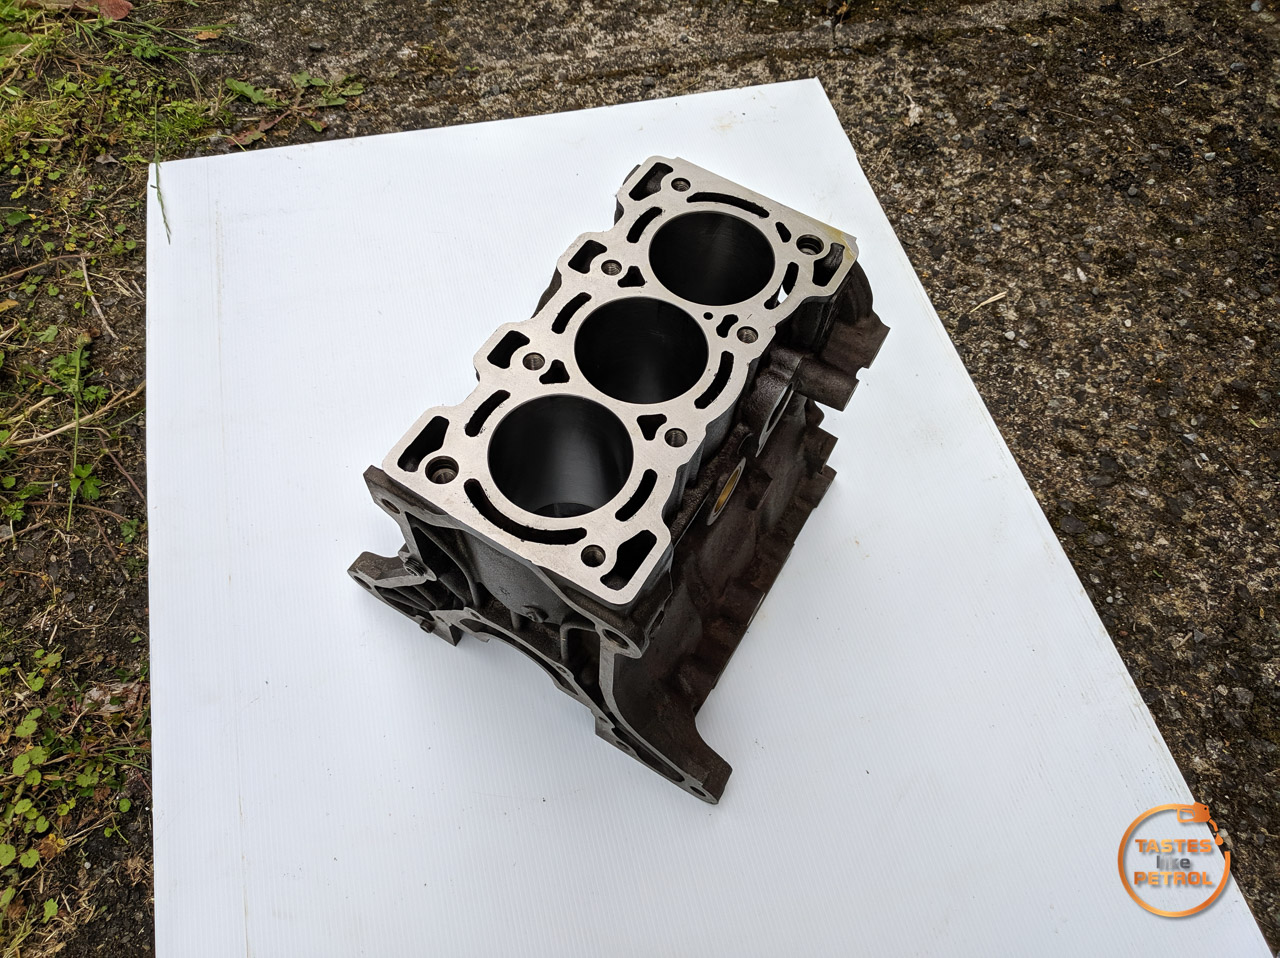
Unfortunately, that’s where the issues with the engine began. I got a call before picking it up to say that they had found corrosion in the bores, which the honing wasn’t able to remove.

I was thinking the spots in the circle would be my issue, as I noticed these before it went for machining (it’s just staining), but I should’ve been worried about the line with the arrow instead, which is rust pitting.

I was told by the machinist that if I built the engine like this, I risk it smoking slightly or using some oil. This was totally unacceptable considering the efforts I am going to to rebuild this thing, and my utter hatred for engines that smoke, so I picked it up, brought it home and started looking into my options.
As if by magic, shortly after, my bank account was looking a bit lighter, and these arrived on my doorstep via Japan.


Trust Greddy, by OS Giken, 0.50mm oversized forged pistons

Having the block bored out half a mm oversize will remove the corrosion pitting in the bores, give me a slight bump in cubic capacity to 667cc, and result in stronger pistons that can handle more power in the future.
So, I packed the block up again, with the pistons, and sent the lot to the machine shop again, this time to have the bores resized, and I got them to check and set the ring gaps and install the rings on the pistons for me.
Once again, the block comes back looking great, and this time, other than some light marking from them measuring the ring gaps, the bores are spotless.

I thought, “Heck yeah, I have everything I need to assemble the engine. Let’s go!”
The first step in any engine build, once it comes back from the machine shop, is to give it a thorough clean. Doing a ton of research, I ended up with the plan of hosing the engine down with a garden hose, through all the oil and coolant passages, and then quickly blowing all the important surfaces down with an air gun and then either using WD40 on them (to displace water), or in the case of the bores, scrubbing them down by hand with a clean rag and ATF. The oil galleries also got hosed out with brake cleaner, and all the blind threaded holes were blown out.

After flushing out the coolant passages, this was what came out of them. I’m quite impressed how clean it all is after two rounds of machining, no metal chips came out of anywhere, just these old dry flakes that would’ve ended up in the coolant anyway, which isn’t the end of the world.

Once I was satisfied the block was thoroughly cleaned out and dried, I masked it up ready for some paint

and gave it the old “rattlecan rebuild” in satin black. I did about three coats, making sure to get up under the various sticky-outy bits.


The sump got a quick rebuild whilst we were there too. Looks like the guys that stripped (and ruined) the original engine tanked and cleaned the sump as the inside was real clean and not oily.

Once it was dry, the block was taken inside and the tape removed. Gotta say, you should always paint blocks when building an engine, man, it looks nice!


I quickly refit the oil gallery plugs with some Loctite


After chasing the head bolt threads (which were pretty clean after being blown out)

I carefully taped the machined block deck so it didn’t get scuffed, and then flipped the block over

The main bearing caps had all been cleaned, too. Fun fact, you can tell it’s a Cappuccino engine by the hole in the number 2 cap, as this is what a support for the oil pickup screws into. The Alto cap doesn’t have this drilled, as the pickup doesn’t have a support, since it’s shorter and comes down pretty much under the number 1 cap.


The bearings I chose to use were some aftermarket but OEM Taiho Standard spec bearings. Taiho is the manufacturer of the genuine bearings, and the bearings that came out of the engine, so it should be right, right? I’ve seen a couple of F6A builds online that also used these bearings, and they are sold by specialists (and Partsouq) as direct replacements for the genuine part number.

I cleaned everything thoroughly and then fitted the shells to the block

Followed by the clean and dry crank

Which meant I could check the bearing clearances with Plastigauge (or the knockoff Flexigauge in this case)
Cut a small section off and place it parallel with the crank, across both halves of the bearing surface (the middle is the oil channel and won’t crush the Plastigauge at all)

I carefully fit the caps, torqued to spec, removed them again, and checked that the Plastigauge was squished.

Using the paper that the Plastigauge comes in, check the thickest part of the squished plastic on both ends of the journal.

Unfortunately, despite many attempts, I could not get the squish into spec. It was showing 0.064~0.076mm, which is far too much clearance (not enough squish, the gap between the bearing and crank is too big).

As you can see in the spec below from the Alto manual (and the EA11R Cappuccino manual is the same), the clearance should be 0.020~0.040mm with a limit of 0.065mm. Outside of that limit, Suzuki recommends replacing the crank, as they do not offer oversize bearings.

The lower numbers are the measurements for the crank journal, and what size it should be. I got out the micrometer and measured the crank in as many places as I could. Everywhere measured 43.99mm +/- 0.01mm, well within the spec, so it wasn’t the crank that was the issue.

After tearing my hair out (or what’s left of it), wondering what was going on, I sent the block, crank and bearings off to the machine shop. In my mind, there was no reason for me to suspect the bearings, as when I measured them with my calipers, they measured the same as the stock bearings that came out of the engine.
As it turns out, everything measures in spec, except the bearings. They are a hairs width undersize, which explains the readings I was getting, and also why my calipers didn’t detect a difference; it’s literally a fraction of a mm thinner, and my calipers aren’t that accurate.
Speaking of bearings not fitting, these don’t fit DOHC turbo F6A conrods

You actually need F8A bearings for the conrods, the “F6A” bearings are far too small


I ordered some more OEM ones that were recommended, but since having the news that the OEM main bearings are junk, I will be ordering genuine bearings for the lot. It’s a significant cost, about $500nzd for the set (vs about $100 for the set of OEM), but it’ll be worth it if they just fit and work.
So that’s where the engine is currently. The machine shop is looking into genuine bearings for me now, and I’m doing my own enquiries in the background, just in case they come up short and I need to get them out of Japan. There’s basically a zero percent chance I will have it running over the Christmas break now. In hindsight, I always should’ve got the genuine bearings and not skimped on them.
That’s not the end of the world, though. I have a ton of other work on the Alto to do, such as building the head, rebuilding the brakes and suspension, and a lot of cleaning.
In slightly different news, other things I have obtained…
We did a 6-hour round trip to pick the front exhaust pipe up, as this was missing from the car when it was delivered. Thankfully it turned up at the other engine builders, so the guy I got the car from managed to save it for me. Saves me a few hundred buying a new stainless one.

Thankfully, someone has already chopped out the restrictive ’90s cat

I also obtained a nice Monster Sport Type SP-X rear muffler to replace the very rusty OEM one on the car


Another important piece of the puzzle was to get a replacement turbo. I will eventually upgrade to a bigger one like the HT07A, but for now, I need one that will play nice with the stock ECU and get the car going.
My original little IHI VZ15 (on the right) has a huge amount of lateral play in the shaft, so I bought a spare VZ24 Cappuccino turbo I found online (on the left). They seem to share the same basic frame, and the intake side seems very similar in terms of size


Interestingly, the exhaust wheel on the VZ15 is bigger than the VZ24. I don’t know enough about turbos to know if that’s a good or bad thing, but it is what it is

This turbo has near enough no play, so hopefully it won’t smoke and will make choo choo noises in the meantime.
Speaking of ECUs, I spotted a CN21S Manual ECU on Yahoo Japan, so I grabbed that too. I don’t know what the difference is, I’m presuming it’ll have a higher rev limit to match the manual cluster with a higher redline. There is no boost control, but it may have ignition and fuelling differences since it doesn’t have to account for a slushbox sucking all the fun out of it.
Long term, it’s getting a Speeduino ECU anyway, but this will suffice for now.


Heaps to get on with, not enough hours in a day.