Since the engine was in limbo, waiting on parts and machine work, I started to hunt to find all the rust and fix it.
The first place to start was to get the car in the air and have a good look under it.

I knew there was rust in the LH front sill area, so I started there. This is the hole I poked in the sill at the auction when checking it over. The jacking point has also been flattened.

Moving backwards to another common spot, the rear floor pans were thankfully very solid


As is the “trans” tunnel. This bracket has some paint flaking from it, but otherwise is good

The shifter assembly and rods are pretty manky, but I have new bushes on order for this. A quick paint will make it look spiffy


The boot floor is good

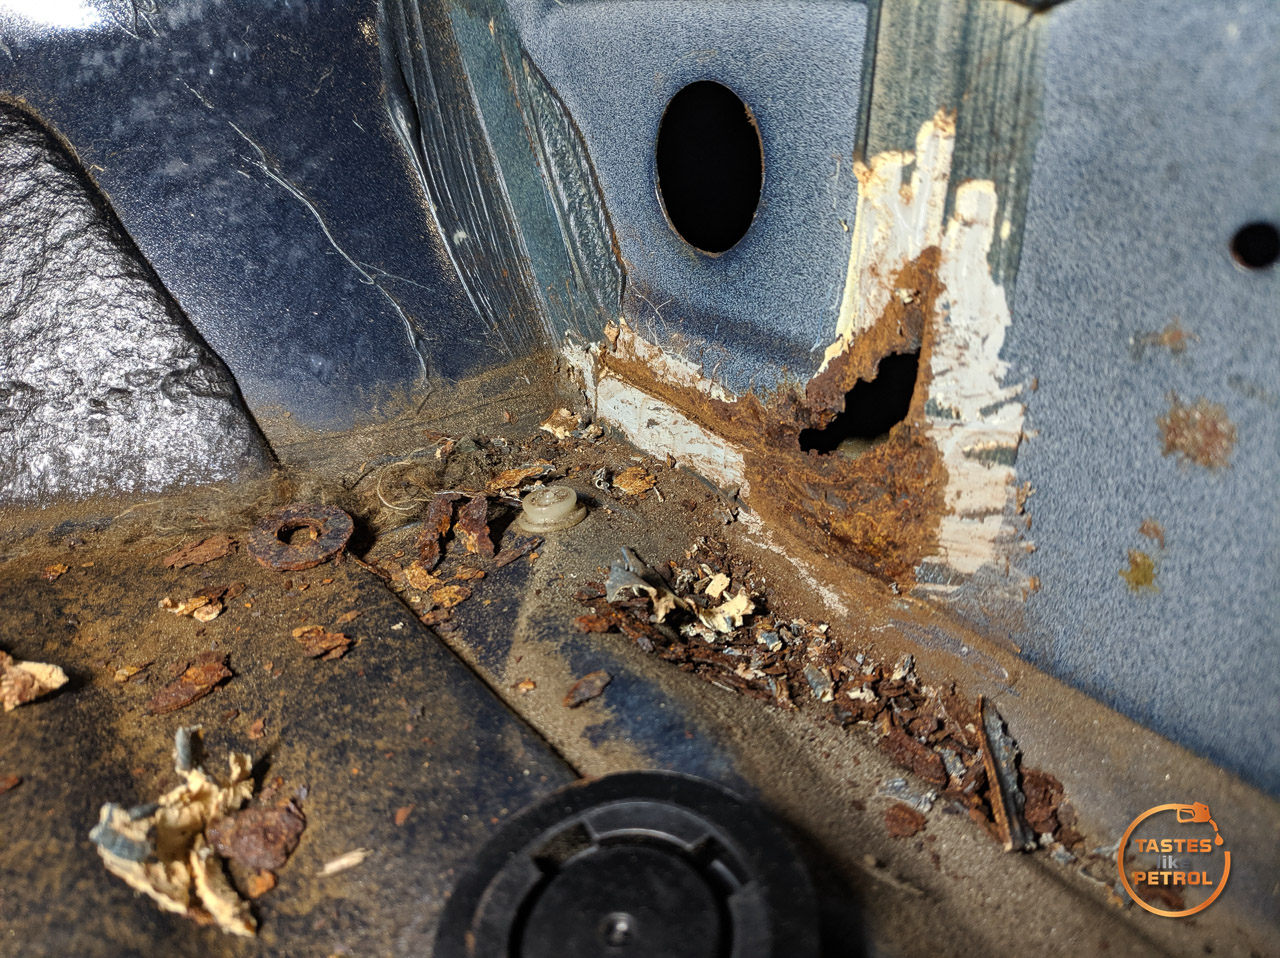
There is a bunch of surface rust on/around the fuel tank. Nothing a wire brush and some rust treatment can’t fix. I need to drop the tank and see what state the inside is. I hope it’s not rusty.

Even better, another rust area I was worried about, the rear spring mounts, were perfect


A loose bolt on the fuel tank. It’s OK, not like it needs to be properly secured or anything…

Moving to the driver’s side, the floor was a bit on the thin side here too

There were some definite holes, which later got the poky poky screwdriver treatment to see how big they were

Finally, the rear tailgate seal lip is very crusty on the bottom. This has been leaking water into the boot when the car was washed, so thankfully, it’s been stored indoors for its recent life.

So in conclusion, the body is surprisingly solid. There is a fair bit of surface rust under the car, which will need to be brushed back, treated and painted/undersealed, but mostly it’s actually just covered in mud under there; It needs a darn good clean.
All the troublesome rust I need to fix is in the floors, one of the sills, the boot lip, and there is a small amount in the bonnet.
The next logical course of action was to lift the carpets and see what was to be seen from the inside.
To do this, I unbolted the seats and tipped them back into the boot, on the folded-down rear seat

The carpet has a bit of a smell. The previous owner cleaned things like the seats and steering wheel, but I don’t think he cleaned the carpets. I will give it a wet-vac before reassembly. The seats came out easily enough.


With the seats removed, the carpet comes up easily enough. I needed to unbolt the lower seatbelt anchors as they go through the carpet, and there was a surprise screw under the LH side of the rear seat base (which was a pain to access with the front seats on the back seat…). The dead pedal was a pain too; I thought I could just unbolt it, but it turns out it’s bolted in a million places under the carpet and not possible to do, so I carefully stretched the carpet around it to get it out.
This gave me the first glimpse of the floors and inner sills

The rear, as suspected from seeing the underside, was solid. Dirty, but solid.


The fronts were hiding their rust

In the photo below, you can see one of the other common rust spots – the seam sealer where the A pillar meets the inner sill. In this case, it’s actually bursting out. I knew about this fairly early on, as I checked it when I got the car after watching the videos of when Garage Kei was pulling his Alto apart.

Also visible in that photo was a reason for my potential death had I not lifted the carpet…

What’s that, I hear you ask? Well, it goes here

It’s the fricken clevis pin from the brake pedal. Instead of firmly pushing the brakes, the clevis just slid up and down the pedal. This definitely was not on top of the carpet, so I can only presume that when they had the pedal box out, the pin slipped down behind the carpet and wasn’t seen again until now.
I quickly grabbed a new split pin and refitted it how it should be.

I also found the circlip on the end of the pivot for the clutch pedal was too big and fell off when I touched it. Needless to say, it is all going to get a thorough going over.

Anyway, back to rust hunting.
The driver’s floor doesn’t look too bad, just the one hole (for now)

and the rust is doing its best Alien chestburster impression

So, out with the big screwdriver and start poking


Onto the other side. Thankfully, the pillar/sill, although showing some surface rust under the sealer, was solid

There were a couple of holes in the floor here

I got out old mate paint pen, and started marking them out


Moving back under the car, I had a look at the LH front sill

I started by using some big grips, a hammer and dolly, and straightening out the jacking point.

To check how far the rust hole in the sill went, I had to remove the sill cover. Thankfully, with some gentle persuasion with the impact screwdriver, all the screws came out without too much issue.


Other than the obvious rust hole, the sill and bottom of the guard are actually in good shape

I also straightened the driver’s side jacking point while I was at it

Around the back, after some investigation, the seal lip was looking pretty substandard


I’m not particularly looking forward to working out how to fix that, but it’s gotta be done.
The bonnet didn’t escape some poking and paint pen

That was all the excitement for that day, other than quickly whipping up a blanking panel on the 3D printer for the hole in the firewall where the old Auto shifter cable went

I used the old dirty finger on paper method to trace out the hole

I then imported this into Fusion, and traced around it

After extruding it, sending it to my printer and printing it in PETG to withstand heat, this is what I had

I’ll get some nicer bolts and sealant to seal it in place, but otherwise it should do nicely.
Moving on to last weekend, it was time to deal with the rust. I dug the welder out from the dungeon under the house, found my trusty grinder, body saw and finger sander, and set to work.
I started on the passenger’s side, and of no surprise, the scope crept once the abrasives touched the metal

Until I ended up with a much bigger hole

I cleaned up the edges, and zapped some nice new steel in place

Despite good penetration, I decided to weld the underside too, just to make it nice, strong and tight. As close to seamless as I could

It was hard to get a photo because it was so shiny, but the holes in the sill got the same treatment

It still needs to be seam sealed, but I coated it in epoxy primer to protect it. It’s not pretty because I don’t like completely grinding down welds if I don’t have to, as it can make them weaker or introduce pinholes, but the seam sealer will cover it all anyway.


Moving to the other side, the holes got a lot bigger here

I zinged this patch in with a few plug welds to tie the sill and A pillar sections together, since it’s an overlapping intersection of panels. I cut back through just the sill, so there was exposed A pillar metal to weld to.

The holes in the floor were next

Once all the holes were filled with new metal, I epoxy primed them and then hit them with a coat of zinc-rich primer over top. I also sprayed this into the sills wherever I could access


The next day, it was time to finalise all the work. I started by seam sealing everything, making sure there were no gaps or holes.


This side was a little different. On one side of the pinch weld is the floor, the other is the sill. On the floor, I seam sealed it, on the sill I used some body filler to smooth it out

The filler was sanded and then primed. I wasn’t aiming for perfection, just to smooth out a couple of low points from grinding the welds back.

Once the seam sealer had cured, it was all covered with an epoxy top coat. This will seal and protect it all. The majority is either under the car, hidden by the carpet, or under the side sill cover. Only a small section will be visible. This is the same basic treatment the Marina got, and I’m happy with how that’s holding up.


I still need to tackle the boot lip and the big hole in the bonnet, but I need to get the seats out of the boot before I can work around there.
All this messy work needs to be done and dusted before I can even consider building an engine in the garage, so with parts starting to arrive, I need to sort it soon.