As the first step to sorting out the issues needed to get Snicket on the road, I decided to remove the radius arms, so it also knocks out two jobs in one.
I had suspected there may be some play in the rear arms, as when taking a corner hard, the inside rear edge of the tire would often make contact with the body… and it shouldn’t be able to do that. They also look super old and crusty.
The first thing to do was to whip the wheel off, and check out the “soft suspension” that was noted. You can also see on the right of the photo, where the tire has rubbed the inner guard.

I think I found why it failed on it…
The shocks have leaked all their oil out, and are doing nothing. The other side was worse! Ok, so that’s fair enough.
Next was to remove the drum and inspect the LH brake, which was the one noted as doing nothing. I backed the adjuster right off and pulled off the drum

There is a bit of grease on the hub, but nothing inside the drum. The shoes are showing weird markings, but could just be because they havent been used in anger for a while.

No obvious signs of brake fluid leaks from the cylinder. As a test I set my camera up and checked what happens when I put my foot on the brake, without the drum on. I should have seen the shoes get pushed out by the cylinder… but I had nothing. Not a mm of movement. Guess that’s that; the cylinder is seized.
I took the dust cap off, and I’m sure it’s not meant to look this grotty

Moving along, I proceeded to disassemble the arm for removal.
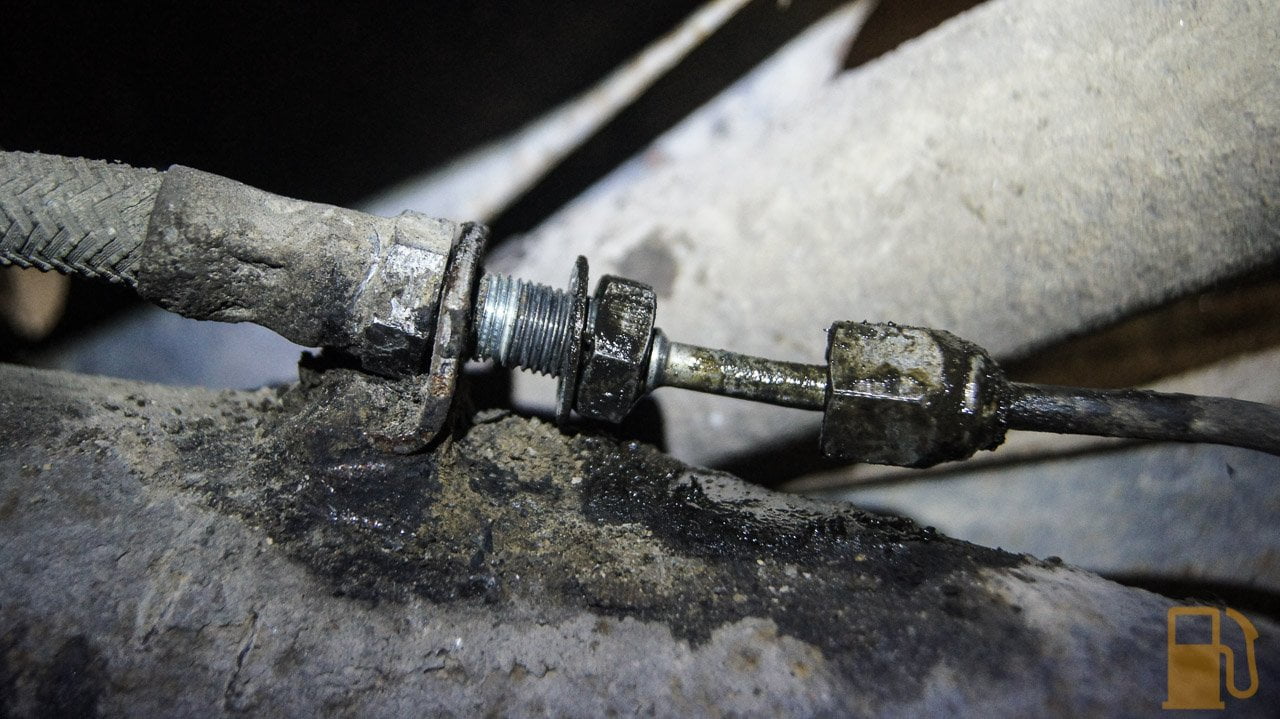
Disconnect the brake lines from the hose. From left to right, is the fixed nut on the hose, bracket on arm, star washer, locking nut to secure hose to bracket, and then the brake pipe nut.
Removing the shocks was next. For the LH side I had to move the fuel tank to access the shock, which was a pain. Also found more surface rust, which I brushed back and treated (looks worse in the photo than it is). I used my cordless ratchet to spin the nut off

But like most shocks, the shaft will try to spin, so I used a pair of vice grips to lock it in place. Worked like a charm

The shocks when removed offer almost no resistance to being moved by hand.
Since the arm can now drop right down, I removed the trumpet and cone. On this side I had to use some percussive persuasion with BFH to free the cone from the trumpet, but it was only stuck there, not seized, so didn’t take much. The other side came apart easy.

Somewhere in here I removed, but forgot to get photos of, the hand brake quadrant. It’s on the underside of the arm, and in the left of the photo above with the cable running to it. Mine was held in place by a split pin, onto a pin that goes through the arm. You also need to remove the cable from the bracket on the backing plate of the brakes (and from the lever, just a split pin and remove the pin). Do this by levering the metal collar with the spring, out of the tab on the arm and pulling the cable free.
Next I removed the brake hose from the bracket on the subframe, and from the pipe. This is not fun to access, but can be done. I have replacement hoses which will be fitted on reassembly.

With the hose out of the way, there is a large nut on the side of the subframe that needs to be removed

And another on the outside of the subframe, where the grease nipple is. I have also loosened one of the outer mounting bolts in this photo, above the arm.

Another bolt is hidden under the arm

Then there are another two under the bracket, and once removed, the arm can be pulled free from the car

My arm is pretty grotty. Old grease, dirt, and what I think is a Lanolin based rust protectant.


The other side is the same deal, and took me about quarter the time to remove that the first one did, but with one little catch. The brake splitter is close to the RH side, so the brake pipe is very short. There is very little movement in it, so to access the nut on the side of the subframe I needed to remove the bolt holding the splitter to the bracket, and gain some space. You could also just remove the pipe from the splitter, which is probably better, but I didn’t want to risk rounding the nut. It looked old.

This side was worse when the arm was removed

I’m going to have to chip all that out before I refit the refurbished arms. Oh well.
So the arms are out, I have ordered two new brake cylinders (RH side cylinder didn’t look any better, so doing both) and a new set of shoes. I’ll be dropping the arms into the local Mini specialist to have him fit the rebuild kit, as I don’t have the tools to ream the new bushing out, and I’ll get him to fit the new brake cylinders too. Once they are done and back I can reassemble the rear, and start work on the front.