I’ve not driven the Marina since the last update, and it’s been a month now. The reason? My usual “it’s on the road now, let’s pull it to bits” thing.
To be fair, it’s not without reason though. In my last outings in the car, I found the engine would cut out under higher RPM, so I wanted to investigate this.
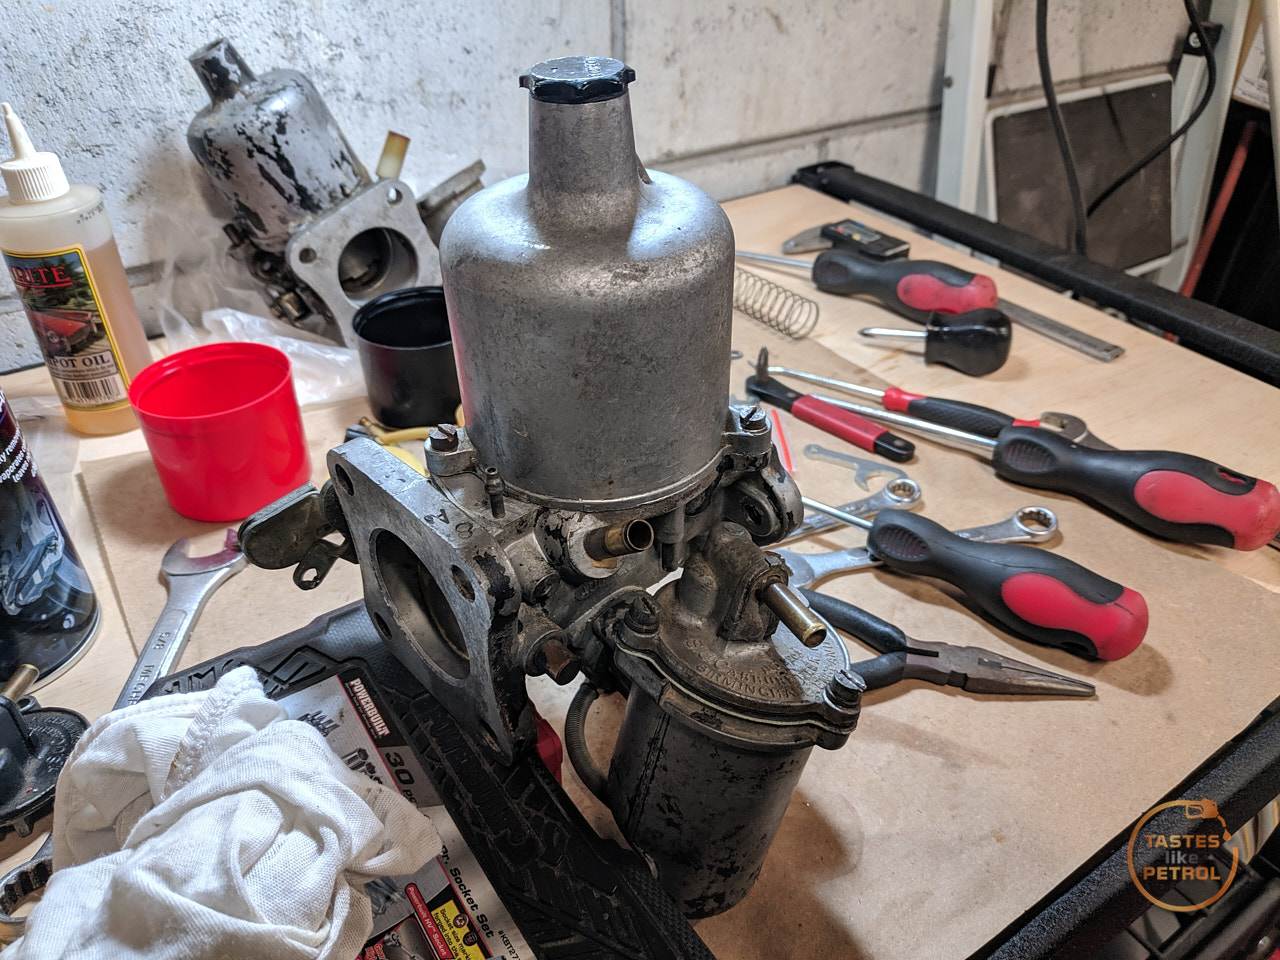
Since I got the car, despite having run and driven it a bit, other than cleaning out the fuel bowl and tweaking the mixture, I haven’t actually touched the carb.
To kick everything off, I thought I would pull out the old carb that came in a box with the car, and strip it down to see what state that was in. The fact it had a big X marked on the top of it didn’t bode well.

I love SU carbs, they’re just so easy to strip and service. Nothing fancy, but does the job.

Sadly, there is almost nothing in this carb that was reusable. I pulled the throttle spindle out and it had massive wear


The bushing in the body was worn too, as even the “good” bit of the shaft would wobble about when tested

With the right tools, some new bushes and some time, I could fix that, but I really don’t care for it.
Even the needle was stuffed. The holder is cracked and the needle itself is actually bent


The jet seems to be welded into the jet bearing, as when trying to remove it the complete plastic end of the jet decided it would rather come off instead

So moving on from that development, I popped the bonnet on the Marina. This is what I started with

I removed the air filter saucepan and its intake pipe which gave me access to the mighty SU HS6 carb

Three tight and one loose nut later, the carb itself was off. The gasket and under the carb were all quite wet with oily fuelly muck

The heat shield and spacer came off next

With the carb on the bench

I removed the fuel bowl lid and was annoyed at the muddy sediment on the bottom of the bowl

It didn’t really act like rust and wasn’t ferrous, it was more like dirt. I have a filter in the system before the fuel pump, and that not shown any signs of rust or dirt (yet), so I’m not sure where this came from. I cleaned the bowl out when I first got the car running.
The float looked fine. It moved freely and had no signs of liquid inside it

Next I removed the damper, suction chamber and piston. This allowed me to remove the needle, which I confirmed is the correct “BAN” needle for single carb 1750.

One of the biggest reasons for servicing the carb was due to this, a sticking jet when the choke was applied. The jet doesn’t return and causes the car to run super rich and drop a cylinder

Usually it takes just a gentle tap with your finger on the bottom of the jet to pop it back up again, but this requires popping the bonnet when starting cold, which is unacceptable when you have an image to withhold.
It should sit all the way up against the adjustment nut

The fuel feed hose had been weeping too

I removed the jet and feed hose

I thought it was weird there appeared to be no seal on the end of the hose in the bowl… turns out it was still in the bowl

Careful use of a couple of picks and I managed to chip the “rubber” seal out. It was harder than plastic. The new seal is to the left of the remains

I ran some brake cleaner through the jet and found more gunk

I cleaned the outside of the jet and inside of the jet bearing up as well as I could, and when testing on the bench it all worked nicely with no sticking

I fit the new seal to the fuel feed hose. A new washer came in the gasket kit, but I found the outside diameter too big and I couldn’t thread in the fitting, so I ended up refitting the old washer and it works fine.

And refitted to the fuel bowl. It turns out this also wasnt tight when I removed it, as the fitting screws much further in than it was

The choke linkage was also refitted

I refit the needle to the piston and after a thorough cleaning of the inside of the carb body, refitted the piston.
As its turns out, the spare carb had a different piston spring. Neither have any obvious paint markings to show which one is “RED” as indicated in the manual.
The one from the spare carb is slightly longer and has thicker wire in the coils


and the one that was in the carb on the car

I don’t know which one is right for the car, and just for curiosity I fit the thicker coil spring from the spare carb to the car to see what it was like. I might need to swap back though as I’m having some weird tuning issues.
Next was the fuel needle and seat, and float. The needle and seat are what stops the fuel flow into the bowl, so it doesnt overfill and overflow. As the level in the bowl rises, the float will rise up with it and at a certain height it presses on the back of the needle and pushes it into the seat, blocking the inlet.
My needle and seat appears to be original, and replacements these days come with viton rubber tips, to help seal. Mine was a plastic body with brass tip.

With these carbs, to remove the needle and seat you need to remove the float. This is held in place with a small hinge pin. I used a smal punch to carefully tap it out enough to grab with some pliers


The seat just unscrews from the cap. The spare carb had one washer under the seat whilst the in car one had two. These set the height of the float

The new needle and seat. The new needle is all brass with a viton rubber tip

After a lot of faffing about with float levels, which I’m still not 100% sure is right, the new needle, seat and float were refitted. It’s annoying these floats don’t have a metal tab that allows for adjustment.

With a new float bowl gasket, the carb was reassembled. I didn’t remove the throttle plate or shaft as I didn’t have new ones or new screws. There is some play in the shaft, which pretty much dooms this carb, but it’ll do for now.


Before refitting I decided to bite the bullet and remove the inlet/exhaust manifold. I knew there had been a leak, it wasnt bad, but it was a good time to address it anyway. Plus, this gives me a chance to prep the fittings for easy removal when I go to fit the twin carb manifold.
By some miracle, all the nuts and bolts came off without issue. The only little hangup was that the front stud was rusted into the manfold, and needed some persuading to give it up.

The inlet port sizing on the manifold is… slightly mismatched. I may check the match on the twin carb manifold and massage it if needed

I cleaned the face of the head up with the wire wheel on the drill

Add went through with taps and dies cleaning all the threads


DIY short spinning tap handle

After cleaning up the manifold I found a rather decent crack in the casting between the two center exhaust runners


That necessitated some copper exhaust spooge on the gasket, for maximum sealing

And with that, I banged it all back together, with new gaskets on everything

Because I’m sick of the saucepan handle rattling on my hood prop, I replaced it with a cheap foam “pancake” filter. So much room for activities now. In hindsight it’s a bit close to the heater hoses, so I should’ve got the offset mounting to raise the filter up. Oh well.

I’ve set the carb up, and tuned it as well as it wants to be tuned. It runs well, but I cant help but think the float height or piston spring arent quite right as when lifting the piston the engine revs up slightly and then dies, indicating its lean, but if I add more fuel it starts to run a bit rubbish. At the moment its running at the “audiable sweet spot” where it sounds happiest running.
Unfortunately the damn jet is still sticking when the choke is applied, so this carb isnt long for this world. I have a kit to rebuild the twin HIF4s, so they will be going on the car some time soon.
It’s no real surprise I guess; only a month or so ago the jet was completely jammed solid and didnt move, so I’m lucky I can use it at all.
In the mean time, I wanted to investigate the ignition system a bit further to see if it has any affect on the cutting out at high RPM.
I have nothing against points, they have their charm, but I wanted to convert to electronic ignition to do away with any risk of the points or condensor being an issue. I bought an Accuspark Stealth “Kit 4” for a Lucas 25D distributor, which I can now confirm works fine on the Lucas 29D4 in the Marina.
The old points and condensor accepting their fate

I pulled the rotor off and removed the points and condensor

I wouldnt be surprised if this had something to do with the issue…

The main power feed to the points had been “fixed” at some point, with the worst crimp they could find. I don’t even know if any copper was still connected, or if the only thing holding the terminal on the wire was the insulation. I could spin the terminal right around with no issues.
This also wouldnt help

With some careful poking and prodding I pushed the grommet through the housing and removed the old wire

The terminal fell off once out of the car

The new Accuspark pickup fits right in, after smearing some of the supplied thermal grease on the underside. The pickup ring slips over the shaft easily. The kit comes with new grommets, only one of which will fit and annoyingly it’s not quite right, it should really have a 90 degree outlet to avoid the clip for the cap, but it is pliable enough that you can bend it out of the way without issue.

I wanted to also replace the coil, as I suspect it was probably original.


I got a nice Powerspark high output coil. Its very understated, with not even so much as a label on it. Perfect.
UK spec Marinas mounted the coil on the inner wing, away from all the heat and vibration of the engine

Aus cars didnt have that luxury, the coil is mounted on the engine. It’d be quite an easy thing to change, I believe the holes are even already in place. Unless you’re me, and have mounted an aux fuse box to that location. Nuts.

Oh well, I cleaned the inside of the bracket up

And mounted the new coil. Its a little bigger than the old coil, so its a tight squeeze. The Accuspark gets wired straight to the positive and negative terminals.

The rotor, cap and sports car racing leads were all refitted again. You’d not even notice the fancy newfangled technology hiding in the distributor

The car fired into life straight away, with no issues, which was a relief. Once it was warm I checked the timing, which was a little more advanced than it should be, so I knocked that back a little, tweaked the carb tune and took it for a run around the block.
I’ll tell you what, it has no trouble revving to the 5500rpm redline on the tacho now! The sound it makes from the little pancake filter too, its excellent.
I’m not 100% happy with the carb, so will do a couple more tweaks on that, but otherwise its running and driving very well. I think the biggest surprise for me is that the gearbox syncros can keep up even at over 5000RPM on a 1st to 2nd change.
Heaps on the list of things to do, but I’m really trying not to get too stuck into much else that will take it off the road, as if we can get some sunny days for once, I want to be able to drive the car.