Following on from making the calipers all nice and shiny, the rest of the front suspension needed to be refreshed to bring it up to the same standard.
The first job to refresh the suspension was to bring out the mighty slide hammer and bash some hubs out.

I don’t love the design of having the rotor behind the hub like this. The Marina is the same, but at least it has tapered bearings, instead of roller bearings like this.
Using the wheel studs and nuts, I attached the hub puller fitting

Then the slider hammer was threaded into place

After a few good whacks, the hub came free


Even though I do own a press, the manual says this is the method for pulling the hubs, and I do believe this is easier than trying to press the hub out of the knuckle off the car.
As a note, on the Works cars, there is a little spacer in the back of the hub. Make sure not to lose this, and that it’s fitted the correct way around, with the taper facing the hub. It normally sits right at the base of the shaft and spaces the hub off the bearings.


Because the wheel bearings were noticeably rumbly and I wanted to replace the bearings while here, I also had to pull the knuckle off the car.
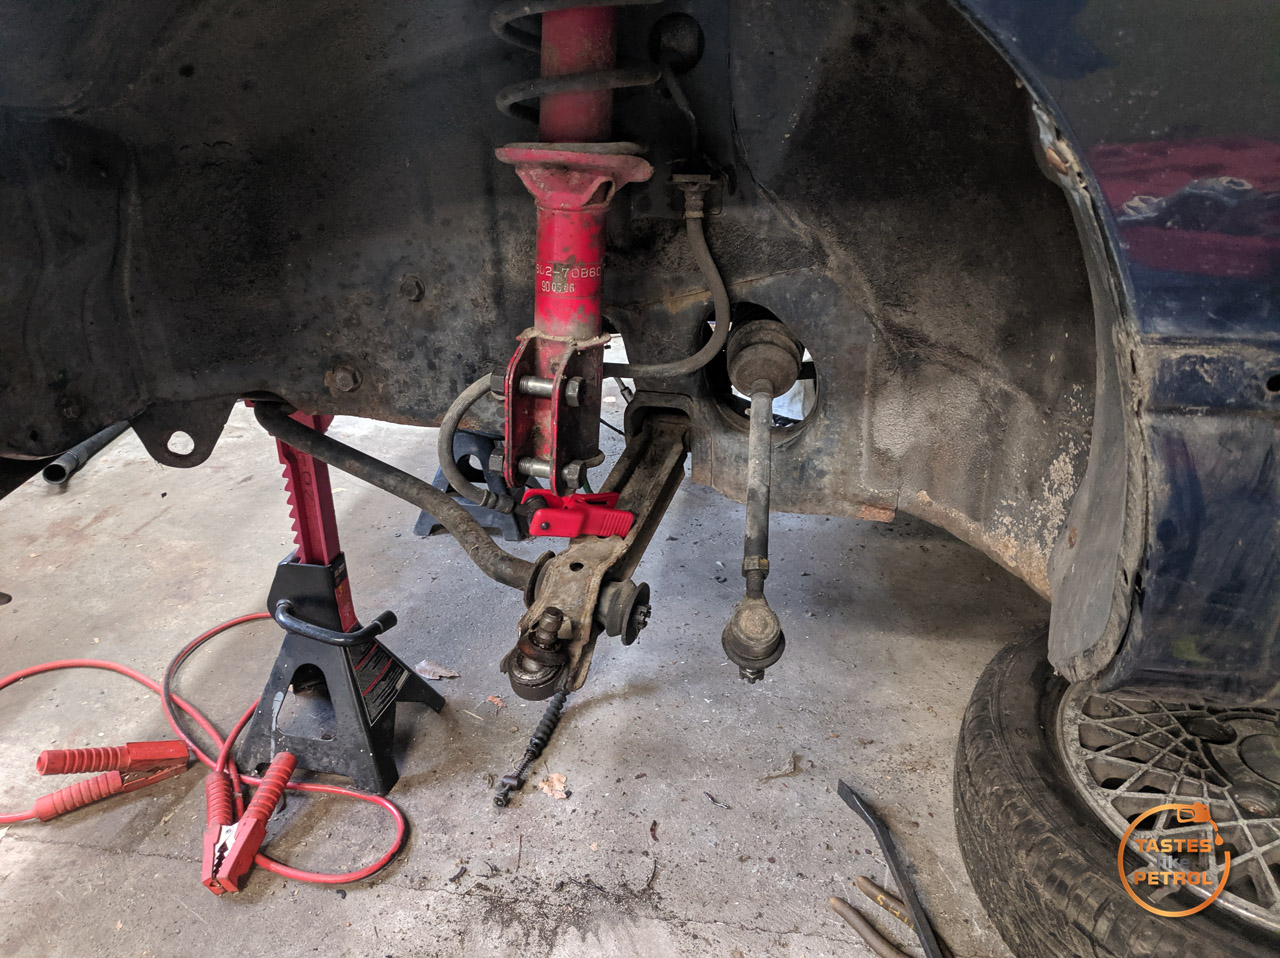
The tierod end ball joint was pressed out

And the bolt securing the lower ball joint was also removed. This left two bolts holding the knuckle to the strut, which were easily removed.

The sad-looking lower arm. The ball joint felt as bad as it looked, so replacements had already been ordered

As it turns out, there are actually heaps of aftermarket options for these arms, as they were used for years on a few different Suzuki models around the world. I grabbed some Meyle ones from Spareto.


They did come with new bushes for the swaybar, but I believe due to a change in design, they need some tweaking to fit, and since I’ll be removing the swaybar to fit the engine, I have put them aside for now.
The lower arms are held in place with a single 14mm head bolt through the inner bush

And then the swaybar. I removed both arms together, as it was easier than trying to wrangle the swaybar out of one arm

Replacement was as simple as just sliding the new arm into place in the front mount and sliding the bolt through the bush

As not to stress the bush, I did tighten the inner bolt up at about what I expect the ride height might be, but since I have never seen this car on its wheels with an engine fitted, I had to guess. Worst case, it’s pretty easy to access the bolt to redo it once it’s on the ground.
Annoyingly, the manual offers no torque spec for the front suspension at all, so everything was just done to the Japanese equivalent of Gutentight – グーテンタイト (blame Google Translate).

The new arms are a bit nicer than the old ones

With the arms fitted, I moved back to the hubs and knuckles. The first task was to knock off the rotors and hope the replacements I ordered were right (they were). Four bolts and a tap with the hammer, and the rotor comes off.

I wirebrushed all the mating surfaces and then installed the shiny new Brembo rotor

I popped that aside and moved on to the bearings. Everything was covered in grease, so I guess I’ll need to take a good look at the CVs before I reinstall them.

I couldn’t get my seal puller in under the seal, but a small pry bar worked a treat

Which then revealed the inner bearing. There are two bearings, an inner and an outer, which are separated by a sleeve between them

You can see the sleeve here

I started with the inner bearing, as it was easier to hammer out since it didn’t sit nearly flush with the front of the knuckle, as the outer bearing does. Carefully using my punch, I tapped the sleeve between the bearings off to the side, giving me access to the inner race of the bearing (the rusty lip visible in the photo)

I then wailed on the bearing with my hammer and punch, taking turns on alternate sides of it, until the bearing came out with the sleeve

The outer bearing was easier to press out on the press. I used an old inner bearing race from a previous job, and a big socket to press it out


Notice that only the outer faces of both bearings have seals; the inner faces are open to the inside of the knuckle, which is why it’s packed with grease.
The new bearings I got have seals on both sides, so one seal per bearing needs to be removed. I know some in Japan that do this job, pack the bearings with grease and then seal them up completely, but I didn’t like that idea, so I went with the OE style of having them open to the knuckle.
There were two recommendations I came across in my travels. One was to use C3 spec bearings, which have a little extra clearance, and the other was to make sure you replace the grease in the bearings with new, proper wheel bearing grease, as they barely come greased from the factory.
I popped the seals off the bearings, and yes, they barely have any grease in them

Using the old lump-of-grease-in-the-palm method of greasing bearings, I packed the bearings with high-temp wheel bearing grease


And one seal per bearing was then refitted

Next, I cut up one of the old bearings to make the outer race into a pressing tool. This allowed me to hammer a new outer bearing into place without putting pressure on the inner race


But it was more important on the inner bearing, since it’s deeply recessed. The cut in the old bearing stops it from getting stuck in the knuckle as the new bearing gets hammered into place. Both bearings will bottom out against ridges inside the knuckle to set the depth. Don’t forget to pack the inside of the knuckle with grease and refit the sleeve between the bearings.


I also used the old bearing race to knock the new axle seal into place


The final job was to mount the knuckle in the press and press the hub into the bearings. There was no way to support the inner race of the bearings to do this, but since it took little pressure to press through, they should be fine (and it’s better than what the manual recommends; bashing the hub in with a hammer)

Which ended with a nice shiny assembly with a new brake rotor and bearings. I couldn’t help but test fit a caliper

Looks good to me. Now to give it something to hang off and then I can reinstall it.
With the knuckle gone, the strut is only held in with two nuts on the top mount and the brake hose. Remove those, and the strut comes right out
These are the shocks listed in the parts book as “RED” and appear to be made by SHOWA, a well-known supplier of genuine accessory/uprated shocks in the JDM market (and motorbike shocks, but they aren’t my thing).

I had to scrape years of crud out of the top mount before I could access the top nut

I cleaned that out, stuck some spring compressors on, and zinged the top nut off

I forgot to take a photo, but the top rubber mount was compressed to about 3/4 the height of the new one. Unsurprisingly, the old shocks were completely poked, with little resistance to compression and zero rebound.
I did find it interesting that the top bearing on these is nothing more than a plastic piece that rubs against a metal disc with a loose rubber seal to keep grease in

There is meant to be grease in the grooves to lubricate the lot, but I hadn’t cleaned that, and both came out like that, with no grease inside them at all. I probably could’ve greased them up and reused them, but I ordered new bearings instead.
These are aftermarket, but even the new genuine ones are the same updated style, which is a self-contained version of the same thing.


I popped one apart to see what was inside it. I know the Honda version has metal bearings inside, so I was surprised to see this was nothing but grease and what appears to be a coated (Teflon maybe) plastic disc with grooves in it, like the old bearing.

I did fit the new bearing whilst retaining the metal disc from the old bearing. Without the old metal disc, the new plastic bearing would have all the pressure on just the outer edges where it backs up to this cap

The metal disc mostly covers that recess and gives more surface area to support the bearing.

Moving on from boring bearing things, this is a nice shiny new KYB “New SR Special” shock

Here it is again with all the gubbins reinstalled, including new top mount rubber, new bearing, and new boot/bump stop

Surprise, here it is again, back in the car this time

The hub/knuckle was then refitted. I presume that the unused tab on the right is for cars that have ABS, which mine does not.

As a fun little thing, these camber bolts, which came fitted to my old HA36S Alto Works (and were incorrectly fitted, so got removed when I first got the car)

Fit the CN21S Alto Works perfectly, so they got fitted and set to max negative camber, because race Nugget

With both shocks renewed and both knuckles refitted, I could fit the brakes. Two bolts hold the caliper in place, and the pads are slipped into place, retaining the original shims. I got all new hardware for the pads, and used Endless pads

The front hoses got replaced with nice new Spiegel braided lines


There seems to be a bit of confusion online about what pad hardware works. It seems genuine pad hardware isn’t available alone, and only comes with expensive new genuine pads.
I can confirm the TRW PFK75 kit fits perfectly.

My calipers only came with one of four anti-rattle clips

So I was pretty keen to get some replacements. As you can see below, the TRW clips are almost identical to the original one I removed (even if my original one is a bit mangled)

The little retaining pins are also the same. The pad locking block is slightly longer, but fits perfectly


With those in place, I gave the system a quick flush and bleed, and the front end (other than the swaybar) was done


It’s pretty colourful in there, but it should look a bit less Fisher Price with the wheels back on.
I still need to replace the rear brake hose and the rear brake shoes, but that’s a job for another day.
Parts Used
Front Shock Absorbers – KYB New SR Special – NST8006R & NST8006L – Yahoo Japan
Front Brake Pads – Endless MX72K – EP237-MX72K – Blackhawk Japan
Braided Brake Hoses – Spiegel KBS104-1 – Yahoo Japan
Brake Pad Fitting Kit – TRW PFK75 – Spareto
Front Brake Rotors – Brembo 08.D165.10 – Blackhawk Japan
Front Wheels Bearings – 6007 2RS C3 x4 – Local Supplier
Front Hub Axle Seal – 09283-44011 – Amayama
Strut Top Mount Kit – SNR KB690.06 – Spareto
Strut Bump Stop/Boot – Febest SZSHB-WGR – Spareto
Front Lower Arms – Meyle 29-16 050 0012 – Spareto
Please note these parts are specific to my car and may vary. Please check before ordering.
I have no sponsors; all suppliers shown are for reference only, and where I got mine from.