One of the big hold-ups with the Alto was that the fuel tank was… less than ideal.
I knew it wouldn’t be in good shape, since the car had been sitting for years, but I had no idea what I was dealing with, so I needed to drop the tank. I couldn’t risk the injectors getting clogged with rust.
I could tell there was some fuel in it, and the gauge said it was “full”, but could I trust it?
Using a hand pump, I fed the hose in until it was in the fuel (which was surprisingly hard to do), and started pumping

But I only managed to pump out about 5 litres or so. No matter what I did, the pump was coming up dry

The fuel stank. It was old, but not 2012 old, and seemed relatively clear. Given that, I knew the tank wasn’t completely empty, but the only option was to drop it anyway. I carefully removed the four bolts holding it in place, cut/removed the fuel hoses, removed the filter, undid the fill hose and breather and then lowered the tank on the jack. Turns out, it was actually pretty heavy…. certainly not empty.

I started draining the rest of the tank by pouring it out through the inlet, and when that no longer worked, I removed the pump and sender and used a small hand pump to pump out the rest.

Turns out, it was full to the brim with 30L of fuel. Stinky old stale fuel.

The fuel pump gave me my first idea of what the inside of the tank was like. A bit crusty. It’s also interesting to note that it’s an upgraded DW200 pump, albeit it’s seized solid.

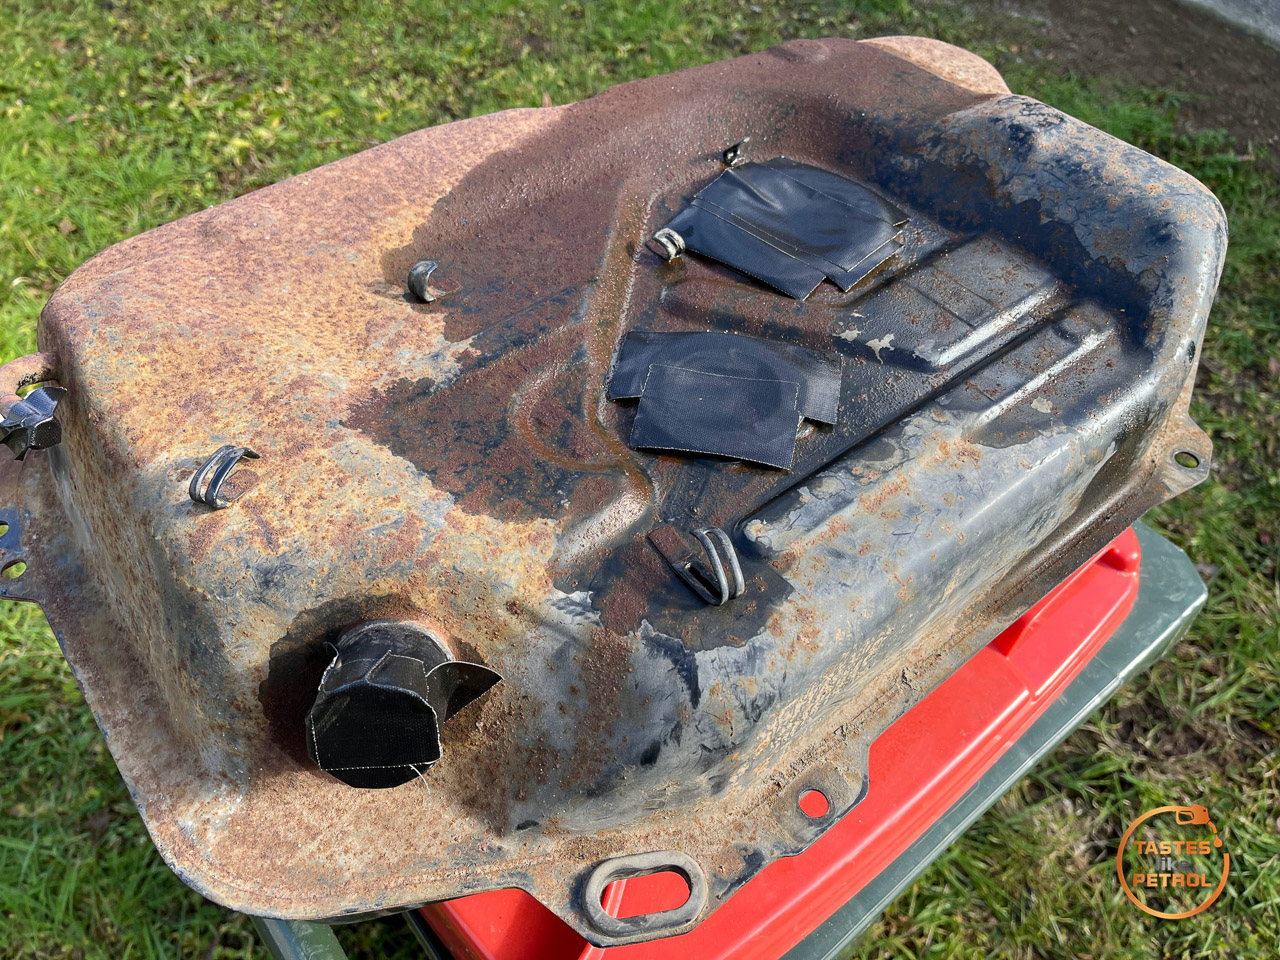
With the tank drained, I took it outside into the sun and had a good look inside it

The pickup baffle was coated in surface rust, and the rest of the bottom of the tank was covered in a sticky fuel varnish


There was a rusty tide mark about halfway up the tank. I suspect that for the first decade of sitting, it had half a tank in it, and as part of the previous owner’s investigations to get the car running, the tank was drained and completely filled with fresh fuel.

So that’s where I got up to, for a couple of months. I ordered a replacement fuel pump to suit a Nissan S15 Spec S (non-turbo SR20DE) as I had heard this was a plug-and-play upgrade with a little more headroom than stock.
I also rang the local radiator place to see if they could give the tank a clean out, but they were very non-committal and didn’t seem keen to do it without “seeing it first”.
In the end, I ordered a KBS tank reconditioning kit to suit a “large” 45L motorcycle tank.

I had previously used this kit on my old Yamaha tank, and it seemed to work well and was easy enough to use. It includes a cleaner, a rust killer and the actual liner, along with some gloves and instructions.

I took the tank outside, and using duct tape, sealed up all the holes except the one I needed to pour the cleaner into first. Pouring in the required mix of 1:1 solution and hot water, I sealed the tank and alternated between sloshing it around and letting it sit. It was a lot of physical work to slosh the tank around so much.

After the required time, I drained the tank and washed it out. I was pretty darn impressed, almost all of the varnish on the bottom of the tank was gone, and the metal was left very clean, albeit the surface rust was now obvious


I did two rounds of cleaning to get it as good as I could.
Before pouring in the next step, the rust killer, the tank needed to be dried out. I did this by stuffing a heat gun into the filler and got the tank hot

Once the tank was dry, I moved onto the next step, pouring in the rust killer and then leaving it to sit, rotating the tank to a different side every 5 mins or so. I did this for about an hour, whilst doing other work on the car. This was then drained out, and the tank was thoroughly rinsed and then dried again


The final step is to pour in the liner and slosh the tank around a lot, to make sure it coats all sides and gets in all the gaps.


It took an age to start setting, and it seemed almost impossible to get the excess out, so I had to keep it moving around for a few hours. When moving it around, I had to be really careful as it seemed to have a habit of pouring through the holes at the bottom of the pickup baffle, and I couldn’t risk them blocking up. In the end, I got the whole tank nicely coated, and the excess settled on the bottom of the tank.
As an aside, whilst the tank was hot and soaking, I gave the top half a quick wire brush and blow over to make it more presentable.

After a few days of drying, I was ready to refit the pump and sender. First, I needed to replace the pump and refresh the sender.
I stripped the pump hanger

The old and new pumps and the replacement filter bag (from Toyota, as this is apparently the same as the original Alto one; interestingly, it’s the same as the one that came with the new pump). I should mention the reason I didn’t use any genuine Suzuki bits for the pump was that none of it is available separately; it’s only available as a now obsolete complete assembly.

Checking the pump wiring, and it didn’t look that hot. The ground screw was pretty crusty

and the power feed had been badly crimped

I cleaned up the ground screw and threads, and crimped a new terminal on for the feed wire

Using the new little star clip thing, I fit the new filter to the pump

This isolator is pretty old and crusty, but I couldn’t find a replacement. Annoyingly, I had a problem where if I mounted the pump correctly, with the O-Ring in the top seated, the pump wasn’t sitting on the isolator. It’s the same size as the old pump, but if I pulled it down so it was seated on the isolator, the O-ring was barely engaged. I couldn’t risk the o-ring leaking and losing fuel pressure.

Looking around at what others have done, the solution was to cut off the O-ring receiver and replace it with a submersible fuel hose instead.
So I ordered some hose

Took the victim to the dirty bench

And using a Dremel cut-off wheel, whizzed it off. Afterwards, I flared the end of the pipe a little by rolling a screwdriver around inside the pipe and putting pressure on the edge, just to give the hose something to bite into, not that it has anywhere to go if it did slip down

This allowed me to mount the pump correctly

A new seal was slipped over and fitted in place

Before fitting it, I also took a look at the fuel sender. Using a multimeter, I checked it and found some wonky readings about halfway through the range. You can also see the tide mark of where the float was sitting all those years.


I hosed brake cleaner through the gaps, and after actuating it, it got a bit better, but I really needed to open it up
Using a small flatblade, I very carefully levered up the tabs holding the cover on and removed it

You can see some buildup on the wires in the middle

Using a fibreglass brush, I carefully cleaned up the wires and the face of the arm that contacts them. Testing showed that it was consistent across the range again

I refitted the cover, gave everything a good clean and used a new seal

and some new screws, I refitted the sender and pump to the tank


As both were fitted now, I could refit the new hoses and wiring

I then refitted the refurbished tank to the car

Including a new fuel filter and new hoses

I haven’t had a chance to test anything, other than the pump before fitting, but hopefully I will be able to get some fuel into the tank soon, ready for its first start.
Parts Used
Fuel Pump Filter Sock – Toyota 23217-0D070
Fuel Pump (S15 Type S) – Generic 17042-85F00
Fuel Filter – Suzuki 15410-51E01
Fuel Pump/Sender Screws M5x10 with spring washers
Fuel Sender Gasket – Suzuki 34825-67012
Fuel Pump Gasket – Suzuki 15111-85550
Please note these parts are specific to my car and may vary. Please check before ordering.