As mentioned in the previous update, the gearbox needed some attention. Nothing is straightforward, though.
With the box on the bench, it was quite easy to give it a quick freshen up, ready to go into the car.
The first thing that I needed to do was to replace the axle seals. There was a note on the gearbox when I got it that said “driver’s axle seal leaky”. Interestingly, this one appeared to be rusting under the rubber. Looking at the photo, it looks like it’s deformed the sealing lip too.

A quick pop with the seal removal tool and out it came. The bearing appeared fine. Some old gear oil varnish on it in places, but spun ok.

The new seal tapped nicely into place

The other side got the same treatment


The main thing I needed to sort was the clutch fork, though. This particular gearbox setup requires a slightly unusual clutch release bearing setup, involving a retainer (#5) for the bearing (#4) and two clips (#7) to hold it onto the fork (#6). This is so when you release the clutch, the bearing is pulled away from the pressure plate and isn’t constantly engaged, or just rattling around.

Annoyingly, when I received the car, it didn’t have any of this. Someone had previously fitted the newer-style bearing, which has an integrated retainer and requires a fork with a little pin (#6) for the bearing to slot over, which pulls the bearing away.

Without this pin, the newer style bearing just floats around when not being pressed by the fork.
The solution was simple. Mark the bearing’s travel when it operates, and drill a small 2.5mm hole in the fork for a genuine pin.
Before I could do this, I actually had to remove the fork from the box. It’s held in place with a lower bearing and seal, which need to be removed.

I have previously done a similar job when I did the clutch on my old Swift Sport, which uses a similar setup. With that, I used a cut-up socket as a driver to knock the bearing out. Of course, I can’t find that bit of socket now, so I probably threw it out, thinking I’ll never need that again.
I removed the lever from the bottom of the fork, marking its location first.

And then this time, I used a pin punch to knock the bearing and seal out the bottom.

I could only get the bearing knocked down so far with that

So out came the old vice grips, and I twisted it back and forth until it came out

With the bearing removed, unhook the spring, and the fork can be wiggled out of the top bearing and removed from the gearbox


I checked the travel, marked the location and zinged a hole through the fork

Which allowed me to carefully knock this pin into the hole

Which allows the bearing to do this. The pin is just a retainer to pull the bearing back with the fork; the curved pads on the fork do the actual work for actuating the clutch

It was then a case of cleaning the fork and top bearing, greasing the bearing, fitting the fork back in and using a deep socket to knock the new, greased-up, bottom bearing in place.


The bearing needs to go deep enough that the seal can also go in on top

New seal tapped into place

Modified fork refitted, with spring in place


With the clutch lever refitted, there was one last thing to do before we were done.

Which was to fit the nice new Monster Sport mount, modified in a previous post

Moving on to the car itself now, in preparation for fitting the lump back in, I removed the front subframe. I removed the four remaining bolts for the front swaybar (which was previously left disconnected from the lower arms), and removed it.

Only six bolts are holding the whole thing in. Two on either side, and two at the rear. Remove these and down comes the subframe.

There are only a couple of other small steps, with a few more bolts, and you end up with this.

A walk-in engine bay, perfect for sliding an engine up into
Of course, there were some things to fix before that happened, here too. One was a general clean with some cleaner and degreaser, the other was to replace the vacuum hoses on the firewall solenoids


I removed them, and once on the bench, I realised why the hoses had that weird saggy look

The hoses had gone soft, gummy and swollen

I cut up some new hoses to replace them


With a little tweaking of the length, they look much better. Sadly, the pair of moulded hoses are obsolete, so I will need to reassess what to do with them at a later date.

Moving back to the subframe, it was covered in grease and oil

With some sneaky rust under the rubber mounts

Up on the bench, I wanted to replace the worn-out old bushes


The front hardware to the crossmember wasn’t looking so hot


The rears were a bit better, but not by much. With all the bushes removed, I took both parts outside and gave them a thorough degrease and scrub to get the worst of the grime off.
Once they were mostly dry, I fit the new bushes.
Working on the front, the bottom halves get pressed into place first

Followed by the top halves, which slot over the bottom half

And finally, a new crush tube, which was slathered in silicone grease

Same deal on the rears, except these are fitted opposite, the press through bush goes in from the top, and the slip over bush goes on the underside. This is because at the front the bolts go downwards, and the rears go upwards.

All bushes have large washers that go under the bolt heads.
After a quick meeting with the tap and die set, to clean up the threads, of which most were a bit iffy

The subframe was reassembled.

Since the gearbox and subframe were ready, it was time to get the engine off the stand and reunite it with the gearbox.
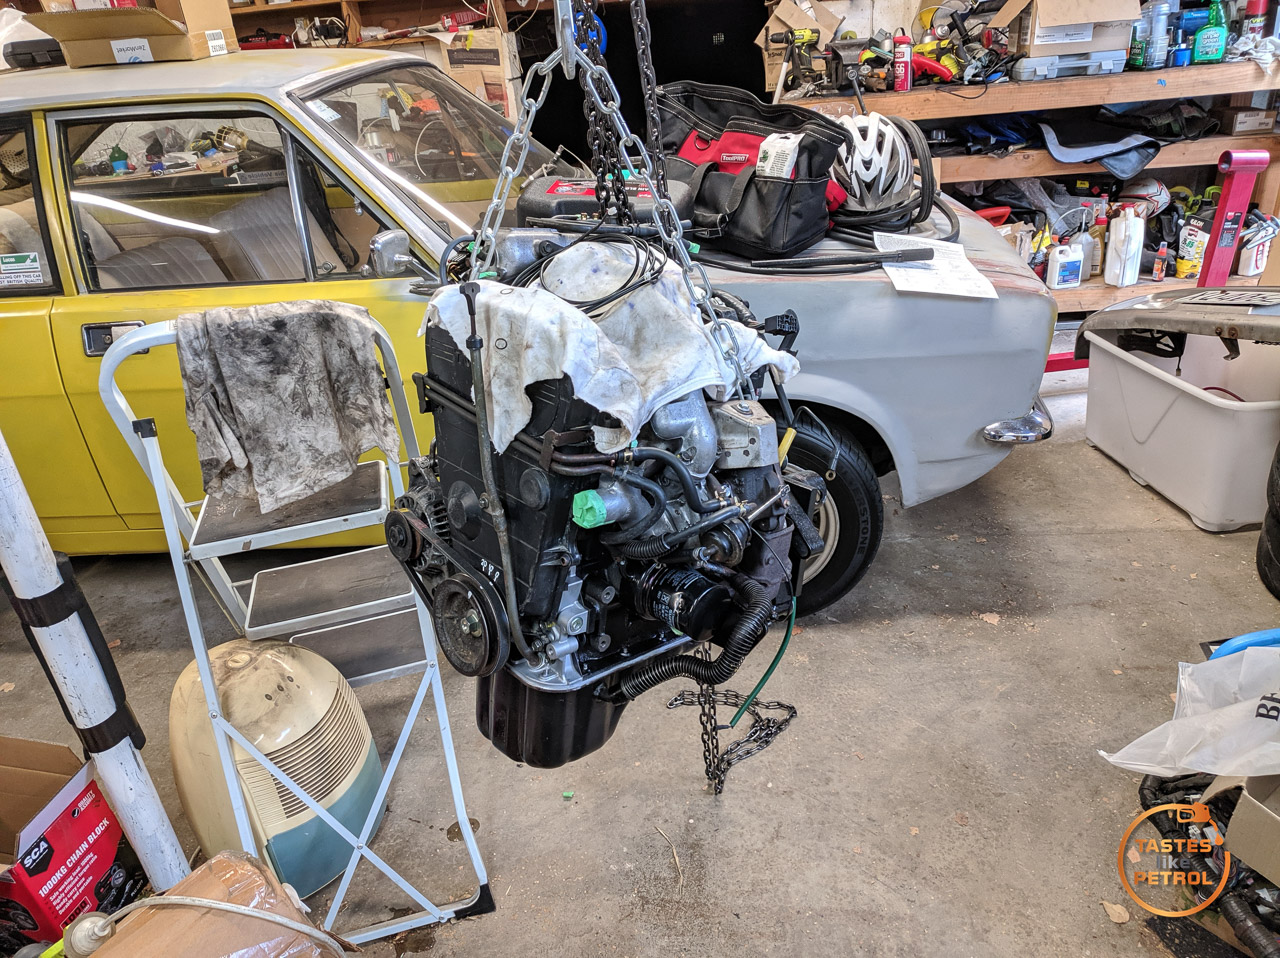
Not having an engine crane, not wanting to buy one, and being a fan of thinking outside the box, even if it’ll make life harder for me, I came up with an option for getting the engine off the stand. A block and tackle. I looped a chain over the convenient beam in the garage and rigged it up.

After a few spins of the chain, the engine was in the air, and the stand was removed.

It was then carefully lowered onto its sump and some lifting blocks to steady it.


With the rear of the engine accessible, the flywheel could finally go on. I had this skimmed when I last had the block in at the machinists, and it came out really well.

I cleaned the oil off it and tapped a new bearing into place

The new clutch was then removed from its box, and the pressure plate was cleaned

Using my high-tech alignment tool that came with one of my past Rovers, I aligned the clutch disc to the pressure plate


The flywheel was then bolted to the engine, and the bolts torqued to spec

Next was the clutch assembly, which was bolted on and also torqued to spec


Thankfully, the gearbox is fairly light, so after some wiggling around, it slipped into place and got bolted down. This only just slipped in under the temp sensors on the thermostat housing.

This meant the starter could be cleaned and fitted

Someone had painted, badly, the starter black at one point

I attacked it with brake clean and a wire brush and got it looking a bit better. This lives in the depths down the back of the engine, completely invisible, so who knows why they did that. Same with painting the gearbox, badly, in silver… too many rattle cans, not enough brain cells.

Of course, I’m not a complete idiot, I did bench test the starter to check that it actually functioned before I buried it in the most inaccessible place in the engine bay.

It took some real jiggling and twisting to fit it into its home with the sensor adaptor in place. Very little room

Starting to look a lot more meaningful

This is the elusive manual-specific coolant pipe that a legend on the Old School forums grabbed for me from Pick A Part.


Without being the one who removed it, going by what’s left in the tubs, the coolant pipes were previously just bodged together with the old cut up auto pipe and some random hoses.
New Monster Sport mounts also found their way onto the front and back of the engine.


As a side note, don’t be like me and forget to install this little brace from the gearbox to the engine mount bracket. It bolts in from the starter side and requires the starter to be unbolted to get the bolt in.

That’s it all pretty much complete now. So I thought, “Well, I guess I should put it on the subframe”, and after some wrangling with chains, onto the subframe it went, and the engine mounts were bolted down.
To move it around and get it into the engine bay, I screwed some casters a friend lent me to a reasonable-sized board. This allowed me to lower the assembly onto this and secure it with a ratchet strap. It was balanced on there pretty well, and I would use this to jack up with my floor jack.

“Well, I’d better just slide it over under the car so it’s ready to be lifted”

And that’s where the ADHD hyperfocus grabbed me, and suddenly this happened.
“I wonder if the jack fits under it”

Short answer, yes, it fits. And so did the engine, into the engine bay.

Oops.
Damn, it looks good in there, though

Other than being bolted in place, nothing else is connected. There’s still a long way to go, but this is a huge milestone.

Great work, nice to see it coming together.